Followers

Showing posts with label dreamweaver dies. Show all posts

Friday, 18 November 2016

Table Decoration for Christmas

Morning Everyone,
I don't know about you, but I always seem to start the year with grand intentions of being super organised at Christmas, which always ends up being an epic fail.
Maybe this year will be different, you never know. I have kept up with my plan to make a few Christmas cards each month, so that's a start, and now here I am making a table decoration so maybe this is the year lol.
This week at WoodwareWitterings we are making table decorations for Christmas so I  decided that I would make an arrangement to go in the centre of our Christmas table.
I cut a square of thick cardstock (the back page from a paper pad) and covered it with a sheet of black and white stars from Craftwork Cards Noir de Luxe 8x8 pad. After sticking them together I tapped around the edge with a versamark clear ink pad and added Shabby White Frantage Embossing powder.
The holder for the candle has been created using the empty centre of a roll of DDST (I told you I never throw anything away!!) and a strip of gold card which I glued to the base.
I stamped and embossed the poinsettias from JGS360 Poinsettia Corner onto Mixed Media card stock using black versafine ink and then sponged them with dye based inks.
I then added more colour with a waterbrush, being more specific with my colouring.
I fussy cut two of the images and then cut the centre petals only from a third.
The holly leaves were die cut from gold and green card stock using Dreamweaver DL3005 Holly Die.
I added some Platinum glitter glue to the centres of the poinsettias and a little Star Dust glitter glue over everything else.
Of course I ended up with some extra images,
and a bit of 'Mop up background'
so I made a couple of Christmas cards to add to my stash.
I hope that you have been inspired to make a lovely decoration for your Christmas table, or even a couple of Christmas cards.
Happy Crafting and Hugs
Kimx

Monday, 22 August 2016

By or Under the Sea for CCM and WoodwareWitterings

Morning Everyone,
We have a new challenge over at CCM today, and as I am also on the DT for Woodware  who are our sponsors this time round I will be sharing first so you get a little bit of a head start.
Bec is hosting our By or Under the Sea challenge at CCM, so we want to see what you can come up with that is either an underwater scene or a coastal/beach scene. 
I wasn't sure what to make for this as I don't seem to own very much in the way of sea themed stamps, 
 however what I did find were several Dreamweaver Metal Stencils which worked every bit as well.
 A seahorse
and a rather nice tropical fish.
Of course the beauty of a stencil is that you can just turn it over, and hey presto your fish is swimming in the opposite direction lol.
If only you could do that with a stamp!
I also found that I had a rather nice fish scale stencil which I used to create the background.
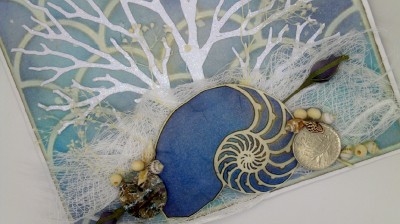
The coral like structure is actually a tree die, also by Dreamweaver.
I added a strip of medical gauze along the bottom edge and sprinkled it with some Frantage Powders making sure to heat from underneath so as not to blow the powder everywhere. 
 Of course I had to play with my stencils before I came up with my finished design,
 so I made a second card with the leftovers.
 This card shows off the background stencil a little better.
 This time I used a Nautilus shell and some assorted ephemera from my stash.
This picture also gives you a better idea of how I used the stencils.
First I ran them through my embossing machine making sure to follow the suggested layering stack as recommended by Dreamweaver.
Next, keeping the stencil firmly in place I sponged the image with dye based inks and then used a fine black Micron pen to draw around the stencil to add in all the detail.
Finally I fussy cut the images and brushed them all with some gold gilding wax.
I hope that you will join us this week, both at CCM and WoodwareWitterings.
Have a marvellous Monday.
Happy Crafting and hugs
Kimx

Friday, 15 July 2016

Good Luck with Woodware Witterings

Morning Everyone.
My turn again over at WoodwareWitterings where this week we are sharing Good Luck cards with you.
I have used my Dreamweaver Alphabet and Number Dies to create the Good Luck tiles.
I die cut the letters in both white and kraft card and then pieced them back together giving me two sets of letters.
The rest of the sentiment comes from an old stamp set FRCL 056 You Did It, and I created the flower out of heart stamps from another set JGS395 Wedding Hearts.
Of course as I had two sets of letters I just had to make a second card.
This time I used a couple of different stamps from FRCL056 You Did It.
I hope that you have been inspired by our offerings this week. Why not check out what the rest of the DT have been up to HERE.
Happy Stamping and Hugs
Kimx

Saturday, 23 January 2016

Handmade Embellishments

Morning Everyone,
It's my turn to 'Create Embellishments' for the Woodware blog.
I love making flowers so it was a bit of a no-brainer when it came to choosing what I was going to make as my embellishments.
They can be a little bit time consuming and require a bit of work, but the beauty of them is that you can make them in what ever colour or style you like to suit your chosen project.
No more searching through a drawer full of flowers to find that they are all the wrong colour for what you want.
Once again I looked on Pinterest for inspiration, of which there was plenty, and settled on these shabby flowers created using several different sizes of scalloped punch and some pages out of an old poetry book.
You will find a link to the flower tutorial HERE although I did adapt it slightly.
I also used a leafy Dreamweaver die to create the background to the card.
Or at least I used the leftover kraft card after I had die cut the leaves from it.
This was also an idea that I got on Pinterest (HERE).
I added some faux stitching around the edge of the kraft panel and also a few dots of platinum glitter glue.
I hope you have enjoyed our posts this week, why not check out what the rest of the team have been up to.
Have a great weekend.
Happy Crafting and hugs
Kimx

Wednesday, 23 September 2015

Paper Pieced Christmas at Woodware

Hi All
It is my turn to play at Woodware again today, but I'm afraid that I am very late to the party.
I confess that I must have fallen asleep as I was writing the post and forget to schedule it, which on reflection is probably no bad thing given it's half finished nature lol.
Dorothy has chosen 'Paper Pieced Christmas ' for us this week.
I love Francoise Huge Word stamps which lend themselves perfectly to this type of technique.
I made a circular easel card for my project using papers from a Craftwork Cards paper pad and a sheet of green Magenta paper.
I added a few snowflakes to the image before I attached any of the fussy cut letters so that they look as if they are behind the writing.
Stamp and emboss the Jingle Bells onto three different pieces of background paper and again on to a large white circle of card.
Fussy cut all the letters from the sheets of background paper and lay them onto the image on the white card before sticking them in place using wet glue.
The base of the easel card has been embellished with flowers punched from the scraps of paper
and branches cut from the Dreamweaver die cut Naked Tree. This was cut from some home made glitter paper
I searched high and low for some bells to add to the card (Davina came to my rescue with a couple that she found in her stash, added with the ribbon bow) and then I remembered that the stamp set actually contained its very own bell stamp.
One of the things I love about Paper Piecing is that with a bit of thought during the cutting process you can actually end up with several finished panels which are then very easy to turn into cards.
So watch this space, as they say, cause you know I'm on a mission to use up all the left overs lol.
I hope that Dorothy will forgive me for the lateness of this post, and that you enjoy a bit of Paper Piecing inspiration from the Team this week.
Better get this posted before I fall asleep again. I've been to the gym this afternoon and I'm starting to feel sleepy.
Night night.
Hugs Kimx

Monday, 14 September 2015

Floral Embellishments at CCM&More, sorry I'm late

Hi All
Oh Dear, I did it again.
I am trying to pay catch up after spending a fabulous weekend visiting my youngest Granddaughter and realised that I haven't blogged my card from last Monday when we started a new Floral Embellishments challenge over at CCM&More.
I actually made this card for the latest copy of the Woodware Catalogue (page 16/17)
using a lovely floral stamp set, some Dreamweaver leaf dies
and my favourite Dutch Doobadoo Dotty stencil, dye based inks and Gold Gilding Wax.
I fussy cut all the flowers and added them to the handmade background using silicon to give them added dimension.
I hope that you get the chance to pop over and see what the rest of the team have been up to before the challenge finishes, and I will try and get round to visiting some of the lovely entries.
By for now.
hugs Kimx

Monday, 17 November 2014

Happy Birthday Matthew

Hi All,
Just a quick post tonight as I have several parcels to get packed up ready to take to the Post Office tomorrow, and the time is getting away from me. Where does the evening disappear to so quickly?
I have had several cards for 'Little People' to make recently, including this one for the son of a former work colleague.
The image is a pre-coloured topper from Lili of the Valley.
I die cut it using a circular Nestie and mounted it over a scalloped circle of Kraft card.
I added some sponged ink while the image was still inside the die and also some faux stitching.
The sentiment is from Hobby Art and the number has been cut using a new Dreamweaver die set that I recently purchased.
Better get back to my packing or there will be a lot of disappointed people when the postman arrives.
Happy Crafting.
Hugs Kimx

Friday, 7 November 2014

Christmas Collage at Woodware

Hi All
I'm hoping that Blogger has been kind this morning and that this post has gone through as scheduled.
I am filling in for the lovely Siobhan for a couple of weeks so that she can have some time off.
The challenge at Woodware this week is Christmas Collage so I consulted Google for a definition, and this is what I came up with.
  • A composition of miscellaneous materials and objects
  • An assemblage of diverse elements

 
I have been playing with some of the fabby new Embossing Folders from Dreamweaver that arrived for me while I have been at SirStampalot.
I can't believe that when you are reading this I will be on the last day of my 'holiday', boo hoo. It goes far too quickly. Still March isn't that far away I suppose, which is when I will be back.
I sponged a piece of cardstock with some dye based inks (red, brown and green) before dry embossing it with FJ922 Christmas Borders one of the Dreamweaver Embossing Folders.
Then I used the same brown dye based ink pad to go all over the image using the inkpad directly on to the cardstock.
By keeping the inkpad flat and using a swirling motion the ink hits the 'highs' of the embossed image which then highlights the nice pattern.
Some of my favourite embellishments at the moment are the Metallic Wax Pastes which I add with a 3/8 inch  stencil brush because I can get the wax out of the pot because of my finger nails!!
The gold shows up much better here.
I used one of the sentiments from JGS353  Festive Verse cut out with a circle die and lightly inked using the same colours.
The flourish, ribbon and pin are also from my new box of toys.
The Dreamweaver Embellishment pin has been coloured with an alcohol based marker and the flourish has been cut from brown card using DM2001 Petite Fern.
The Distressed Cotton Ribbon is also from Woodware and comes in several colours and widths.
I hope that you like my card, and join the rest of the Gang for their take on Collage Christmas.
Have a great day, and Happy Crafting.
Hugs Kimx