Followers

Wednesday 30 June 2021

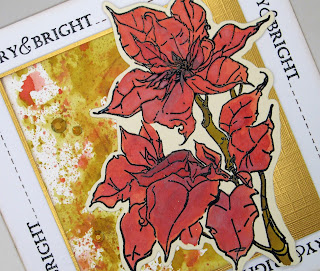
Poinsettias and Mop Up Backgrounds

Evening All,

I made it to work at the right time today :O)

We will be playing with Distress Oxide Inks again on Saturday, only this time we will be doing a little bit of mopping up........ background wise that is.
I do love a mop up background, its a great way to use up all that ink that you end up with on your craft sheet. I hate to waste anything as you know.
I used the Distress Oxide inks to colour in this fabulous poinsettia stamp from Stamps By Me. There is also a co-ordinating die which I used to cut it out and layer it over the background panel.
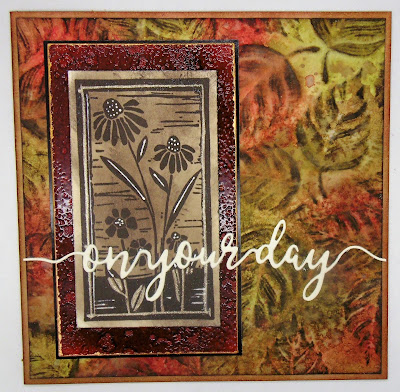
For this second card I used another piece of mop up background and an Altenew die to create a background for the stamped, embossed and coloured poinsettia.
It's quite amazing how different an image can look whether it is stamped and embossed using white or black embossing powder.

Thanks for stopping by.

Hugs Kimx

Tuesday 29 June 2021

Birthday Poppies

Oh Boy, the wonders of modern technology.

As if the day didn't start off badly enough with me misreading the rota and arriving an hour late, our credit card system seemed to have been on a mission to misbehave this afternoon. It certainly slowed everyone down, which it seems most people are not keen to do. Everyone is always in such a rush.

So here is something that I never mind slowing down for, my card making. This one was made using a couple of fabulous Clarity stencils.
The only problem with finding this piece in my stash, is that I can't remember exactly how I made it, 
although I do recall that it involved two separate stencils but used at the same time.
I finished it off with a piece of background paper and a die cut sentiment.
Thanks for stopping by.
Hugs Kimx


Monday 28 June 2021

A New Addition to the Family

Evening Everyone, 

I became a Great Auntie again at the end of last month, when my nephew and his wife welcomed a beautiful baby girl to their family.

Of course I had to make a special card, but it has taken me a while to send it, hence the delay in sharing it with you.

I used one of my Lili of the Valley toppers along with an alphabet die set
for the important details.
I also added some glossy accents and glitter glue
Olivia's birth meant that my Brother became a Grandad, or Pops as he wants to be known, for the first time, so I sent him and Nanny a card as well.
Back to work tomorrow, so it's off to bed for me. 
Thanks for stopping by.
Hugs Kimx

Sunday 27 June 2021

Home Safe and Sound........

...........and only a little soggy.

The trouble with the weather recently is that you never know quite what to wear. I made the mistake of going to Becki's for the weekend minus a coat!! It was lovely and sunny when I left, and it's been raining cats and dogs today. Not a problem while I was there, but a bit of an issue coming home on the train.

Thankfully I found that I had an old cardigan there so I didn't get toooooo wet, but enough to make me want to curl up under a duvet.

So no cards to share tonight I'm afraid. I'll be back tomorrow to try and make it up to you.

Hugs Kimx

Saturday 26 June 2021

A morning of Crafting

Evening All,

There is a small aerodrome in Headcorn, and they have been celebrating the Battle of Britain this weekend. The planes fly right over Becki's house, so we have spent the afternoon darting in and out to catch a glimpse of the amazing old aircraft flying above us. Typically every time I rush out with my camera I am too late to get any decent photos.

Chloe decided that she would be an airplane and I could take a photo of her instead.
The kids spent a couple of happy hours this morning stamping and painting.
Jack of course wanted to be as big as the Girls.
I have given them some sparkly watercolour paint palettes, which they love to use.
We stamped out several sheets of images which we will die cut tomorrow now they are dry.
Jack lost interest fairly early on, but the Girls spent ages painting.
Of course the day started with Chloe's usual request to 'watch Jennifer', so we had the wonderful Jennifer McGuire on in the background while we crafted. I have tried to get a picture of them watching her for ages, and this was the best I could do for now.
I need to get to bed now since I am bound to have a couple of early morning visitors lol.
Thanks for stopping by.
Hugs Kimx

Friday 25 June 2021

A Birthday Shaker

Evening All,

Way back in April I made a bunch of Easter cards using a set of layering dies from Memory Box. See Original Post 

As I said at the time, there were loads of 'bits' that seemed too good to throw away, so I turned them into a few shaker cards, one of which I sent to my little sister for her Birthday today.

I used a couple of large floral dies from Dawn Bibby for the central image on my cards.
Unfortunately as with any shaker card, the acetate makes getting a decent photograph rather difficult.
I filled the black and white version with all of the white die cut pieces along with plenty of glittery bits and pieces from Creative Expressions Cosmic Shimmer range.
I also created a kraft version for the pink and green 'bits'.
I added a bit of gilding wax to the die cut panel for a little added colour.
I hope that my Sister had a nice day, although she seemed to think that it would be spent inside due to the weather. I do hope that we don't get too much rain this weekend as the kids have plenty of plans for me which seem to involve being outside lol.
Thanks for stopping by.
Hugs Kimx

Thursday 24 June 2021

Friendship Blooms

Evening All,

I'm sitting here yawning my head off, but it might have something to do with having just spent some time in the gym. It's a good job that I have a 'Gym Buddy', because I don't think that I would have done anything today after work, except sleep. We are good for one another, spurring each other along when neither of us feel like doing anything. 'Even doing something is better than nothing' is our mantra lol.

As you know I don't like to waste anything, so the background to this card uses the ink that was left on one of the stencils after I had used it on another card. I just spritzed the inky stencil with water and then pressed it on to a piece of card stock.
Once the panel had dried I stamped and embossed the bunch of flowers from Altenew Our Friendship Blooms stamp set. There is also a stencil available to enable you to colour the image easily using inks and blending brushes.
I added some stamped script to the background before I die cut the image and layered it over a white deckled panel.
A die cut sentiment, some faux Card Candi and a white gel pen finished the whole thing off.
I'm having a very early night tonight. It's my weekend with the Littlies, so I will need to be on my game.
Thanks for stopping by.
Hugs Kimx

Wednesday 23 June 2021

What a numpty!!

Evening All,

Just a quick post tonight, I'm shattered............ no idea why in particular, but it certainly hasn't had a good effect on the little grey cells.

Note to self........Don't try to die cut from your beautifully coloured panel after you have just added glitter glue, gems and faux Card Candi stuck on with silicon gell !!!!!!!!!!! What a numpty.

I think this is telling me that it is time to step away from the crafting for the evening don't you.

I'll try again tomorrow.

Night, night

Kimx


Tuesday 22 June 2021

Foliage Stencils

Evening All

I have so enjoyed playing with my stencils this week. They are soooo useful, but I tend to forget about the drawer full of them that I own, so it was nice to dust off the cobwebs and play with them.

I was showing the Girls how to stamp over the top of a stencil, as well as highlighting the image with a micron pen.
I cut the panel in half, having shown them what it looks like with and without the pen highlights.
The card layout was inspired by something that I saw on Pinterest, one of my favourite places for inspiration and a mojo kick start.
I added an embossed panel, using a Lisa Horton folder, to the base card,
before adding the stenciled piece.
For finishing touches I added a sentiment strip and some die cut foliage.

Thanks for stopping by.

Hugs Kimx


Monday 21 June 2021

Red and Green with Stencils

Evening All,

Another miserable Monday weather wise that is, but much more to my liking I must admit. It was even quite reasonable at the gym this afternoon which has definitely been unbearable just lately.

Here are a few more cards from Saturdays class on stencils.
The panel on this one started off as a piece of mop up and brush cleanup paper and then I added the Lavinia stencil and some more distress ink in red and green.
I stamped and embossed this fabulous floral image over it and then matt and layered it using rectangular stitched dies.
I used the same red and green to colour the image, along with a bit of white pigment ink for the main flower.
I used the same stencil on a piece of card to clean off my blending brushes, which led to a rather subtle background to this card.
The floral image on this card is a new purchase from Clarity.
I added some extra ink to the main card and green panel along with a die cut sentiment and some faux Card Candi.
As the stamp from Clarity was a new one I tried it out first on a piece of scrap card to make sure that it stamped properly and I didn't waste my nice background.
Of course it stamped out perfectly, so rather than waste it I blended ink over it and added it to a coloured and embossed panel.
The main panel on the card is a Lisa Horton embossing folder blended with colour and spritzed.
I added a die cut sentiment to this card as well as some white and gold Gelli Roll glaze pens.
I can't believe that we are actually at the longest day in the year. How did that happen? It certainly isn't what you would expect of the middle of June.
Hope you have a great evening.
Thanks for stopping by.
Hugs Kimx


Sunday 20 June 2021

Purple Poppy

Evening,

After our lovely class yesterday I have been trying to finish off a few bits of homework.

This fabulous floral stencil was a favourite with all of the ladies on Saturday.
I created a piece of script background with an old stamp and then stenciled over the top using Distress inks.
With the stencil still in place, held there using my Wendy Vechi Make Art Stay-tion, I drew all around the image with a fine micron pen.
I added some soft stenciling to the base card using the same colours, and finished the whole thing off with a die cut sentiment covered in glossy accents, gems and hand made Card Candi.
This second card using the same colours of ink and leafy background stencil from Lavinia. The background started as a piece of clean up paper for the blending brushes. I have one brush per colour family and like to clean them off on a piece of paper before changing ink colours.
I held the white die cut LOVE under the stencil, on top of the clean up paper before adding more ink. I rather liked the contrast on the die cut so I decided to stack it and then add some glossy accents to help it stand out against the background panel.

Off to bed now since I am back at work at stupid o'clock tomorrow. Still at least it shouldn't be too hot tomorrow which will suit me very well.

Thanks for stopping by.

Hugs Kimx