Followers

Showing posts with label dye based inks. Show all posts

Saturday, 14 January 2023

Masking and Memories

Evening,

Just finished packing away after todays Crafty get together. We were playing with the Retiform technique, which is a rather more complicated form of masking. It is really much easier than it actually looks, but takes rather a long time to complete one panel. It is also a very good way of using up several stamps on the one card.

This is a card that I blogged a couple of years ago, as I have plenty of panels but no finished cards from todays session.
As Retiform is a form of Masking, here is a far more simple masked card using one of Jane Gill's fabulous floral stamp sets.
I stamped the flowers and leaves using fussy cut images on pieces of masking sheet as the images are all separate on the stamp set.
I then created a frame out of the masking sheet
and lay it over the stamped images before adding dye based ink to the card.

When the mask is removed it leaves a white frame around a coloured square to which I added some faux stitching. I added the panel onto a base card with the same colours of ink around the edges, along with more faux stitching.
It is lovely getting together with all the Girls to craft.......and natter......and drink tea and coffee.
I took my folders with me so that we could work on a list of classes for this year, which of course led on to how long we had known one another. I have a notebook here which details things like that, so I was able to text back and tell Davina that I had first met her at a Woodware Retailers Day in June 2002!!!! 
Where on earth did that 20 years go to? I have promised to send her a picture of the first class that I taught for her as I am that very sad person that has photocopies of all the classes that I have ever taught, and magazine articles that I have done. Perhaps I really ought to get a life, although to be fair it is a great reference tool when my mojo deserts me. It is also quite fun to look back at how my style has changed over the years.
Thanks for stopping by.
Love and Crafty Hugs
Kimx


Saturday, 7 January 2023

Resist with a Twist

Evening,

An all time favourite for me is Resist with a Twist. More detailed instructions for this technique can be found HERE
The 'Twist' is the stamped image in the background of the panel,
which is then stamped over with Versamark ink and embossed with clear embossing powder.
Once the embossing is covered with ink the image in the background shows through the clear embossing.
I have used a fine text background in both the first and second examples here,
with some lovely foliage for the clear stamped and embossed images.
This final card using a piece of music underneath the clear stamped and embossed floral images.
As you can see silhouette images work particularly well as the focus for this technique. We haven't played with this in a while, so I think that I will have to add it to the new class list for this year.
Thanks for stopping by, I hope that you have had an enjoyable Saturday.
With love and Crafty hugs
Kimx

Monday, 18 January 2021

Faux Letterpress with Embossing Folders

 Afternoon All,

I do love embossing folder and not just for dry embossing card stock.

There are numerous different ways of using them, and probably one of my favourites has to be the faux letter press technique.

They work particularly well with distress inks/oxides, but any dye based inks will do.
Cover one side of the folder with ink. You may need to experiment to see if you prefer the 'inny' or the 'outy' side best, and then spritz the inked folder with water and carefully place a piece of cardstock on to the ink.
Close the folder and press firmly all over making sure not to move the card inside as you are doing it. You can run it through your embossing machine to transfer the ink to the paper, but this means that you wouldn't be able to stamp on to your piece of background once it is dry, but you can use die cuts.
I have loads more samples for you to check out on my blog HEREHERE  and HERE.
Off to the post office with some samples now, thanks for stopping by.
Have a great crafty day.
Hugs Kimx

Friday, 4 December 2020

Inspired by Altenew for a Lifetime of Love

 Afternoon All,

Boy am I glad to be home, it's been freezing at work, although thankfully no snow. I'm so glad when they get the forecast wrong lol.

I LOVE Altenew stamps, and so do the rest of the Crafty Girls, so we often based a class around just playing with my rather large stash of stamps and dies.
This card uses the beautiful Engagement Wishes stamp set. It contains two rather large floral images and two leaves along with a host of fabulous words.
I stamped and coloured one of the flowers and leaves for this card and then fussy cut them before adding them to a white card. The background was created using a stencil, some dye based ink and a blending brush.
I like to show the girls that there is more than one way to use a stamp, and that it doesn't matter if you don't feel like colouring in your image, it can look every bit as good in black and white.
This card uses both of the floral images and a leaf.
I also placed the images so that they hung off the edge of the card and then trimmed them to the shape of the card.
The sentiment was added on a strip of black card stock using clear ink and white embossing powder.
Off to start some more DT work, I have a very busy weekend in front of me.
Thanks for stopping by.
Stay safe and hugs
Kimx


Monday, 5 February 2018

Hobby Art Butterflies

Hello All,
Well I made it through a whole day at work.
I have to say that taking the week off to recover was probably the most sensible thing that I have done in a long time cause I actually feel better. (At least at the moment lol)
Here as promised a while ago are a couple more cards from Hobby Art Jenny's last TV show.
Sorry I didn't manage to get them on here earlier, still better late than never I suppose.
This time they feature the fabulous Butterfly set.
I decided that I wanted to use the largest of the butterflies as it makes such a wonderful focal point. I die cut the corner out of a piece of black card stock using one of Tim Holtz ornate corners.
Having trimmed the panel I gently applied gilding wax and a stamped and embossed sentiment before adding the panel to a white card base.
The butterflies have all been stamped and embossed in black and then sponged with dye based inks.
This second card uses the same images only this time they are stamped and embossed in gold before applying the dye based inks and fussy cutting.
The background has been created using a fabulous 'vintage' embossing folder and black card stock.
Once again I used gilding wax to cover the whole of the background, only this time it was the excess wax that had dried on my craft mat reactivated with Stick Away from Crafters Companion.
Thank you Sheena for that little tip.
Because there were various colours of wax on the mat at the same time it has given the background a slightly muddy look, but I rather like the effect.
I sanded the card back after I had covered the whole thing with wax so that the black showed through.
I added the fussy cut and shaped butterflies using silicon glue along with a sentiment.
I think an early night is in order tonight. I don't want to overdo things.
I won't promise to be back tomorrow, but I will definitely try.
Happy Crafting and Hugs
Kimx

Tuesday, 22 November 2016

Welcome to Your New Home

Morning Everyone
Ive got a New Home card to share with you today.

The slightly spooky houses are a fabulous die cut from black card.
The background layer was created using a Clarity stencil, 
die based inks and my Grand Caliber Embossing machine.
I placed some coloured paper behind the windows and then added Glossy Accents.
The greeting is from a rather old, but well loved Hobby Art stamp set.
I think this has a rather autumnal/wintery feel which goes rather well with the weather that we are having of late.
Have a great day.
Happy Crafting and hugs
Kimx

Monday, 22 August 2016

By or Under the Sea for CCM and WoodwareWitterings

Morning Everyone,
We have a new challenge over at CCM today, and as I am also on the DT for Woodware  who are our sponsors this time round I will be sharing first so you get a little bit of a head start.
Bec is hosting our By or Under the Sea challenge at CCM, so we want to see what you can come up with that is either an underwater scene or a coastal/beach scene. 
I wasn't sure what to make for this as I don't seem to own very much in the way of sea themed stamps, 
 however what I did find were several Dreamweaver Metal Stencils which worked every bit as well.
 A seahorse
and a rather nice tropical fish.
Of course the beauty of a stencil is that you can just turn it over, and hey presto your fish is swimming in the opposite direction lol.
If only you could do that with a stamp!
I also found that I had a rather nice fish scale stencil which I used to create the background.
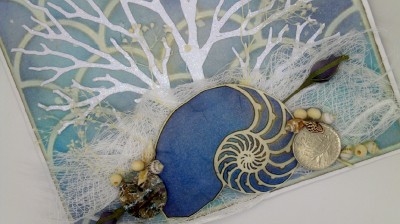
The coral like structure is actually a tree die, also by Dreamweaver.
I added a strip of medical gauze along the bottom edge and sprinkled it with some Frantage Powders making sure to heat from underneath so as not to blow the powder everywhere. 
 Of course I had to play with my stencils before I came up with my finished design,
 so I made a second card with the leftovers.
 This card shows off the background stencil a little better.
 This time I used a Nautilus shell and some assorted ephemera from my stash.
This picture also gives you a better idea of how I used the stencils.
First I ran them through my embossing machine making sure to follow the suggested layering stack as recommended by Dreamweaver.
Next, keeping the stencil firmly in place I sponged the image with dye based inks and then used a fine black Micron pen to draw around the stencil to add in all the detail.
Finally I fussy cut the images and brushed them all with some gold gilding wax.
I hope that you will join us this week, both at CCM and WoodwareWitterings.
Have a marvellous Monday.
Happy Crafting and hugs
Kimx