Followers

Showing posts with label adirondack inks. Show all posts

Friday, 27 February 2015

Down On the Allotment

Evening Everyone,
I don't know what it has been like where you are, but here it has been beautiful if rather cold here.
Some glorious and welcome sunshine which will have started people thinking about working in their gardens and allotments,I'm sure.
How appropriate then that one of 'Hobby Art Jenny's' fabulous new stamp sets should be gardening / allotment related.
She has been on the TV today, and this is one of the cards that I made for her show.
It is very simple but quite effective, and would make a good card for a man or any keen gardener for that matter.
I stamped the Garden Shed from The Allotment  stamp set onto Watercolour card stock using Pesto Adirondack dye based ink.
Then I used a damp paintbrush to 'move' the ink and create a monochrome watercolour finish.
The background is a fantastic new embossing folder from Crafters Companion that I just HAD to have.
It is one of their new Texture 8x8 Range called Leaf Vein.
I embossed a piece of card stock that matched the Pesto ink, and then swiped the ink pad repeatedly over the embossed paper which shows up the pattern beautifully.
I hadn't realised that the card stock was actually slightly ribbed until I ran the ink pad over it, but I think that it just adds to the effect.
I watched out to see the card on the show. It is always such a buzz to see something that you have made get shown on the TV.
The Grandchildren think it's quite cool when I point them out.
Speaking of the Grandchildren, it was the School Disco tonight.
 This is how grown up you can look when your big sister helps to get you ready. How scary is that!!
Ciaran looked very cool too although he was rather annoyed that his hair wouldn't spike up like he wanted it to. Oh dear I really am feeling very old. The kids seem to grow up far too quickly these days.
Off to play now, I have a 21st birthday card to make this weekend as well as several other things.
Bye for now. Have a great weekend.
Hugs Kimx

Friday, 21 February 2014

For Clarity with Love

Evening All
I hope that you are all looking forward to a craft filled weekend. I certainly am, I have new DT stamps to play with and I can't wait.
I thought that it was about time that I entered another challenge, and what better place to start than with the Clarity challenge which this month is Love and Romance.
This was much easier to do since I have now sorted out my Clarity stamps and I can actually see what I have got lol. I used NDC22-G Arty Heart as the center piece for my card, stamped, embossed and sponged using Adirondack ink. 
The background has been created using a combination of Clarity stencils, stamps and more ink.
I also added a few extra dots to the sentiment, some faux stitching around the outer edge and some Card Candi..
The die cut is a new toy that I acquired at Davina's last weekend.
I cut 'Love' from red and white card stock and layered one over the other to add a slight shadow.
I hope this fits the bill for the challenge, I certainly had fun creating it.
Have a good weekend.
Hugs Kimx

Tuesday, 14 January 2014

A new Sketch from Woodware

Evening Everyone,
Woodware have a new Sketch challenge this week,

 and so here is my take on it.
I have turned it on its side so that I could use another of Jane's fabulous new stamps JGS334 Daisy Panel in a Frame.
I stamped and embossed the floral panel onto watercolour card using versamark ink and white embossing powder, and then I painted it with Adirondack dye based inks and the 'Wet Watercolour' technique.
The background papers are from my stash, but originally came from Woodware.
I have added some random stamping to them using another Woodware text background stamp FRS241 Many Happy Returns.
Finishing touches - Stardust pen and Glossy Accents.
Hope you like it.
Hugs Kimx

Wednesday, 8 January 2014

A Winter Robin

Hi All
We had a somewhat eventful day at work today with a 3 hour power cut. It has been quite amazing just how many drivers do not know what cones blocking an entrance mean, I'm surprised that there wasn't an accident.
Anyhoo, I seem to be on a bit of a roll at the moment. I've managed to cross yet another item of my extensive and ever growing 'To Do List'.
I was given this beautiful Robin stamp by 'Hobby Art Jenny' at the NEC in November, but this is the first opportunity that I have had to play with it.
The image on this first card was stamped and embossed onto watercolour card and then painted with Adirondack dye based inks.
I cut the image out using a Nestie and then added some Faux Stitching.
The background panel has been dry embossed using a Sizzix folder.
I just kept sponging it with Adirondack inks until I was happy with the colour. I also added some Treasure Gold guilding wax to the edges as well as the green background card.
White Organza ribbon, some die cut holly, glossy accents, and glitter glue to finish.
This second card was also stamped with Vintage Sepia Versafine ink onto watercolour card, but this time it was coloured using watercolour pencils and then die cut using the same Nestie.
I edged the coloured panel with some Faux Stitching and ink while the die was still in place to give an extra border.
The background papers are from my stash, and I added some die cut holly, gems and glossy accents.
Now perhaps I can get something else crossed off my list, but first I must get this ready to post to Jenny.
Better late than never I suppose, but then I know card samples are always useful to her.
Have a good evening, and thanks for stopping by for a visit.
hugs Kimx

Wednesday, 5 September 2012

I Dare You to Resist the challenge at Our Creative Corner

Evening All
Now as you know I am a great fan of the wonderful challenges run by the Girls at Our Creative Corner.
They are always that little bit different, and they have a twist in the challenge as well.
This week the challenge is I Dare You to Resist Resisting, and here are the FOUR requirements...

1.) Resist Stamping (examples: Versamark, Embossing powder, gel, crayon)
2.)  Describe the technique you used somewhere on your post.
3.) Also, include Wings (Anything with wings or wings by themselves)
4.) This can be a card OR a project (all are welcome!)
This is the card that I made, which I hope will fulfil all requirements, but you can imagine my surprise when I went to add the links to my post to find that I won last week with my Recycled Gift.
I am honoured Guys, thank you soooo much. I will display my badge with pride.
Anyway to get back to my card for this latest challenge.
The main panel has been created by stamping Woodware Alphabet Background onto white cardstock using Denim Adirondack ink and then making sure that it is dry  before stamping and embossing Woodware JGS274 Ferns over the top using Versamark and clear embossing powder.
The next step is to sponge the entire thing with Denim, Lettuce and Meadow inks. This makes the white stamped image 'POP' through the ink and the Alphabet shows through as well.
I also spritzed the uninked stamp with water and stamped this onto the panel as well to give a ghosted image in the background.
I trimmed the panel and having tapped around the edge with the Denim ink pad I then coated it with clear embossing powder which gives a lovely embossed finish to the edges.
Just for You is from a Hobby Art clear stamp set.
I sponged and stamped the main card using the same inks and 'Ghost' stamping and added two die cut butterflies which I also sponged and heat embossed.
Of course no card of mine would be complete without a stitched border and some Card Candi.
Don't forget to pop over and see what the DT have come up with, there are some fabulous creations as always.
Better go now I have a pair of trousers to turn up for my Grandson before he can wear them to school tomorrow.
hugs Kimx

Tuesday, 8 May 2012

One for Sorrow, Two for Joy

Evening Everyone,
I thought that I had better give you a break from samples made with the wonderful Decoupage stamps from Imagination and instead share a card that I made for Barbara. And it was one that apparently gave her pause for thought lol.
It was actually made using my principle of not wanting to waste anything :)
I had stamped and embossed the image a couple of times but had obviously got a stray speck of dirt on the stamp so that one of the birds didn't stamp out properly.
Two of the birds were OK so I decided to cut them out and make a frame of my own around the words with a bit of masking and a fine black pen..
I masked the area and brayered 'A la Barbara' using Adirondack inks Stonewash and Meadow and then stamped the small leaf around the edge of the panel using second generation ink.
I added a little colour to the birds which I cut out and attached using silicon.
The background paper is from my stash and has been stamped and embossed using black versafine and then over stamped with second generation stonewash ink.
I was rather pleased with how it turned out, if I do say so myself.
I would like to enter this in to the challenge at
Anything Goes Challenge Blog - Things with wings
Creative Craft Challenges - Anything Goes
Off to bed now, night night.
hugs Kimx

Wednesday, 4 April 2012

The Brayering Blues

Evening Everyone,
I have been trying very hard to make sure that I finish off the bits and pieces that have been started in a class.
So far so good, so here is a card that uses up a stamped and brayered panel from my last class at Davina's on Saturday.
The stamp is by Stampendous, and the background has been created using several colours of Adirondack ink and a brayer. A small circular mask placed on the glossy card stock before the brayering is started gives the illusion of a sun or moon in the sky.
I have seen Barbara do this on the TV so many times that I thought that I might give it a go.
I also masked around the floral image before I brayered and then added a border with a fine black pen.
The background to the main card is once again made using the brayer and Adirondack dye based inks in 'Barbara style', only this time I have spritzed it with water and then covered it with cling film to give a wonderful frosted finish.
I have added a punched border, some ribbon, peel-off lines and a little bit of bling to the finished card.
I really am going through a blue phase aren't I.
I have noticed that most of my cards seem to be in the same colours just recently.
Still no Christmas cards yet this month, I shall have to get some made if I'm not going to fall behind again. Maybe at the weekend who knows.
Night night.
Hugs Kimx

Saturday, 31 March 2012

More Inky Fingers

Evening Everyone
Boy how quickly does a day off go by.
No petrol queues to deal with today just lots of inky fingers and brayering.
This is another of the cards that I made for today's class highlighting brayering 'The Barbara Way'.
Once again I have used Adirondack dye based inks and a lovely Stampendous stamp as the main focus on the card.
I mask around the stamped image and then brayered ink across it before spritzing it with water.
This time I laid a piece of kitchen paper over it which lifted off some of the ink to leave this lovely speckled effect.
The background to the main card has been created using the resist technique which we will be focusing on in the next class. What you might call a sneak peek lol.
I was pleased to see that everyone else got just as messy as me.
I have decided that it is cleaning the brayer that makes you so messy not using it. Now I know why I don't do cleaning:)
Don't forget to watch Barbara on the box tomorrow.
I bet she doesn't get as messy as we did. More practise needed me thinks.
Hugs Kimx

Monday, 6 February 2012

Crafty Cardmakers Challenge 61 - Monochromatic Magic

Afternoon Everyone
Today sees the start of a new challenge over at Crafty Cardmakers where Beth is asking for Monochrome Magic.

We are sponsored for this challenge by Indigo Blue an English Stamp Company.
It's a two parter, Part One an IndigoBlu FlitterGlu Starter Kit as seen on Create and Craft and Part Two the gorgeous 'Love Is' stamp.


We are also sponsored this time by Digi Doodle Shop, who are offering a $10 Gift Certificate for their Store to the challenge winner.
Like several of the other guys I have opted for blues for my card for this challenge.

My usual choice for a Monochromatic card would be Black and White, so I decided to try something a bit different for me and go with blues. I do seem to be going through a bit of a blue phase at the moment so I suppose I shouldn't be surprised by my colour choice lol.
The images used on the card are from a lovely Woodware stamp set FRCL198 Sail Away. 
I stamped and embossed the image onto watercolour card stock using Denim Adirondack dye based ink.
I coloured the image using a combination of Denim and Stonewash Adirondack inks and a waterbrush. I also stamped the tree part of the image onto some scraps of watercolour card stock and coloured them in the same manner. These were then cut out.
I covered a square white card with several pieces of background paper from my stash. Some of them have been torn which gives the impression of waves or hills, take your pick! Probably hills given that I have added the extra trees to the torn panels using silicon glue.
The stamp set contains several greetings, but I opted for the Happy Birthday.
Although it is quite a masculine card, I couldn't resist a couple of gems.
Why not join us HERE, and of course check out some of the other amazing creations that the rest of the team have come up with.
Happy Crafting.
Hugs Kimx

Saturday, 1 October 2011

Clarity Classroom Lesson 3

Evening Everyone,
I seem to have had one of those days when I just can't get motivated at all. Let's hope I am inspired tomorrow or I will get sooooo behind.
I did get to watch Mulan with the twins so that was a result, I just love that film lol.
Did you catch the Clarity classroom show? These are the cards that I made for my homework.
Mine are completely different from Barbara's, not a brayer or a table top in sight lol.
I have used my nesties for the circles and sponged Antique Linen distress ink all around the edge with the nestie still in place. I also stamped the crackle background around the edges.
I stamped and embossed the vase and flowers separately and then assembled them on the card once I had cut them out. I've added stitching and some crackle watermark stamping to the blue background.
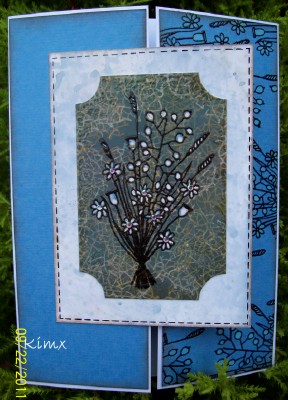
This second card is a Gatefold, with blue panels added to the front. The right hand panel has been stamped and embossed with the flowers and then I've painted with bleach.
The central panel is multiple resist made with the crackle stamp and Adirondack inks. The Bunch of flowers has been stamped and embossed onto it and then the flowers have been painted with bleach.
Don't forget to watch the shows tomorrow.
Have a good evening
Hugs Kimx

Friday, 30 September 2011

An October reminder

Afternoon All
Just a quick post this afternoon to remind you to tune in to Create and Craft (Sky channel 671) tomorrow and Sunday for Barbara's Clarity shows.
On Saturday it is In the Classroom with Barbara at 11am - 1pm where she will be revisiting the Split Tree set and introducing the new Versatile Vase kit.
Then on Sunday there are another 3 hours of Barbara from 10am - 12pm and then again from 2pm - 3pm.
This is a card that I made for the Sunday show last month using the Grasses.
I'm afraid the photography makes it look a bit washed out.
The central panel has been made using a Nestie, and I have added some gold card stock, peel offs and lace. The border punch is by Martha Stewart.
I stamped and embossed a Clarity greeting in white and then sponged Adirondack dye based ink over the entire thing keeping the nestie in place while I did it. I stamped the grasses onto the panel using the same colour ink pad.
The circles have been punched from an extra stamped image.
Don't forget to tune in.
Love and hugs
Kimx

Saturday, 3 September 2011

Don't forget Clarity on TV

Hi All
Just a really quick post to share one of the cards that I made for the Clarity Classroom  show with Barbara.
This uses the Split Tree set which comes with a set of small leaves, one of which you can just see along the top edge of the green card.
The background has been created using white embossed resist and the Cloudy Blue Adirondack ink pad.
Unfortunately the photos don't do the card justice, and my Sky box froze so I'm not even sure that it was even shown on the TV. Never mind you can catch up with the classroom shows on the Create and Craft website.
Don't forget that the Clarity weekend continues tomorrow when Barbara is back with a more normal show format between 10am and 12pm on Sky channel 671.
Hope that you can tune in.
Nite nite
Kimx