Followers

Thursday, 15 December 2011

Crafty Cardmakers Challenge 58 - Use it three times

 
Evening  Everyone
This week we have another challenge over at Crafty Cardmakers, the last one this year, where Tracy challenges us to use the same stamp/image three different ways.
It could be the background, main image and a tag to match for example. (ie Christmas Wrapping Paper, Greeting Card and Gift Tag) Using different colourways is another way, the same image three times, or even, as a couple of us have done, three different cards.
We are sponsored for the last time by the lovely Joanna Sheen who is offering a £10 voucher for her online shop which is crammed full of goodies with new stock arriving all the time! Thanks for everything Joanna!

I'm sorry it has taken me so long to post my cards but writing Christmas cards seems to have got in the way of everything. I'm still not sure that I have actually made enough yet.
It has also been a bit like writing War and Peace, so perhaps you should get yourself a coffee before you read any further.
I must admit that I hate to make the same card twice, so I loved working on this challenge.
Of course I didn't think about having to write the instructions to each card when I made them, I was having way too much fun.
Message to self, think first before making card lol.
I have used a lovely Woodware clear set All Occasions Bloom FRCL200 to create 3 different cards.
Of course if I had been thinking I would have used the same layout for each card like Melly or Lin, but I didn't so here goes with a little bit of explanation.
This first card has used a piece of background paper made using distress inks. I have tapped a couple of colours on to a craft sheet, then spritzed with Glimmer Mist. The next step is to take a piece of watercolour card also spritzed with Glimmer mist to make it wet and smoosh. Each piece will be different.
This is also a great way of using up ink that is left on your craft sheet when you have been using dye based inks and a blending tool.
When the background paper is dry, stamp and emboss the floral panel onto it using black versafine and clear embossing powder. Cut around the image and paint the flowers with thin undiluted bleach.
The floral panel is layered over a piece of white card that has been run through the cuttlebug inside an embossing folder. I added a little co-ordinating ink with a blending tool or a piece of cut and dry foam.
The white strip has been punched with a Martha Stewart punch, and it has then been layered over some background paper from my stash. Add a few pearls and some glossy accents to the flower centres.
I stamped and embossed a couple of extra flowers and coloured them with Promarkers and also a little bleach. These are added to the card along with some punched leaves.
The background for this second card has been made in the same manner as the first, with dye based inks, glimmer mist and a smoosh.
Once again I have stamped and embossed the main image using black versafine and clear embossing powder. I have then painted the flowers with thin undiluted bleach.
Having cut around the image I added some stitching with a fine black pen.
This time I cut the the pale blue embossed panel in half diagonally and layered it over some purple card from my stash.
I added some swirls down the right hand side of the card using a lovely Artemio clear stamp set Delicate Flourishes. I stamped them using a Versamark inkpad and then dusted Pearlex powder over the image using a dry paint brush.
You need a tiny amount of Pearlex to cover the image and then any excess powder is removed with the same dry brush. You can be really quite heavy handed when removing the excess and the image will remain unsmudged.
The ribbon across the middle has been spritzed with water and then scrunched to add a little texture to it.
The padded circles have been made using some of the leftover bits of background and a small circular punch.
The background for the final card has been made in the same manner as the other two.
I'm afraid that all of the pieces came from my bits box so I can't be more specific about the colours that I used.
Having stamped and embossed the image using versafine and clear embossing powder I placed the trimmed panel into an embossing folder so that only one half of the panel is embossed.
I added a little extra ink using a blending tool and then mounted the panel onto black glossy card stock and trimmed to leave a narrow border.
Once again I painted the flowers with thin undiluted bleach.
If you don't like making your own backgrounds you could just as easily use shop bought background papers, the only problem with this is that you cant use bleach to remove the colour from the flowers.
I added a few dots around the stamped image using an Inkssentials opaque white pen, and then added glossy accents to the flower centres.
The background paper on the main card is from my stash. I have added a stitched border to this using a fine black pen.

I have decided to enter these into the following challenges.
Delightful Challenges - Anything Goes
Creative Craft Challenges - Faux or Real stitching
Make it Monday - Always Anything Goes
The Corrosive Challenge - Anything Except Christmas

Well, I hope that I haven't sent you to sleep with my epic post, and that you will feel suitable inspired to enter our challenge over at Crafty Cardmakers.
Better get back to the Christmas cards. I did manage to get another bag full in the post this morning, but I still haven't finished yet.
Happy Crafting and have a good evening.
Hugs
Kimx

Sunday, 11 December 2011

Ethnic Santa

Molly Blooms - Boxing Day Santa Christmas text Background  *Stamp* - Calendars

Morning Everyone
Hope you are having a good weekend and that it is not too cold where you are.
We are really getting into the Christmas spirit here, the light are up on the outside of the house and the tree is in the first stages of being dressed. You can't move for wrapping paper and prezzies, I'm beginning to know how Santa must feel :)
The card I am sharing today was made at the request of a friend at work. She wanted a card for her parents with a Black Santa on it, not something that you can easily find in the shops. It also had to be big with plenty of bling since her Mum is nearly blind and would therefore need to 'feel' it.
She didn't mind whether the card was comical or traditional just so long as it was large so this wonderful Molly Blooms stamp Boxing Day Santa immediately sprang to mind. I have coloured him using Distress inks and then cut him out with a circular Grand Nestie.
The wood grain background is a piece of card stock which has been stamped and gold embossed down one side using X9449G Christmas Text Background and then cut out using another of my Grand Nesties.
The main panel of background paper is Magnolia paper Blue Christmas Holly with a fine handstitched border drawn onto it.
The flowers are a combination of ready made and die cuts with the lovely Heart Swirl Branch Doohickey and Marianne Creatable Pine Tree Branch. The pine branches have been glittered by embossing them with sticky embossing powder and then pouring fine glitter over them.
A Time to Share is from a Woodware clear stamp set FRCL105 Traditional Christmas Greetings and 25th December is from Lili of the Valley.
The whole thing was assembled using an 8 inch square card which I picked up in Peterboro when I was up there last month. I knew they would come in handy especially as they come complete with envelopes. I did suggest to my friend that she might need to post it in a padded envelope just to be on the safe side.
I am waiting to hear what her parents thought of it but she was absolutely thrilled. She has already given me details of the birthday card that she wants for her Dad in February.
I am entering the card into the following challenges
Crazy 4 Challenges - Its Santa
So Artful - Tis the Season picture inspiration
Creative Craft Challenges - Stitching Faux or real
Sassy Cheryls Challenge - Santa
It's no good I must get on with writing my Christmas cards now, I can't put it off any longer.
It really is the bit I hate doing, maybe I should get a stamp made up with all of our names on it to cut down on the hand cramps lol.

Happy Crafting
Hugs
Kimx

Saturday, 10 December 2011

A couple of Cuties - Part 2

Evening Everyone.
Here I am, back as promised, with another cute card.
It was made for Jason's niece on the birth of her second son a few weeks ago.
I have used a Tilda stamp Alvin Sitting which is definitely a favourite of mine when it comes to a new baby card for a little boy.
Once again I have used the 'Outside the Box with a Nestie' technique (see previous post for a link) and coloured him with distress inks.
The word background is from a clear stamp set (I think it is by Hero Arts) that I have stamped twice onto some background paper from my stash.
I have added a punched strip, some gingham ribbon, a few gems and 3 tiny buttons. I also spritzed the card with Glimmer Mist although it is hard to see in the picture.
The main background panel is also cut from background paper using one of my grand nesties and I have added some stitching with a fine black pen. The embellishments in the corners are actually buttons. I cut away the backs and attached them using silicon. 
We had a lovely class at Davina's where the ladies made some beautiful Easel cards.
We have decided that at least for the winter both classes each month will move to Saturday. It will be so nice not to have to go out on a Wednesday evening. As much as I enjoy teaching it is no fun going out at night when you have to scrap the ice off the car.
Off to bed now, it will be non stop card writing tomorrow.
Nite, nite
Hugs Kimx

A couple of Cuties.....part 1

Morning Everyone,
I can't believe it's Saturday morning again, who stole another week from me :)
I still have all my cards to write. I really must get on with that this evening or else all my hard work to get things done early will go to waste.
I will be teaching at Davina's this afternoon, everything is packed up and ready to go, so it seems the ideal time to do a little blogging while I wait for my lift.
This is a card that I made for a lady at work, she wanted a pretty card for a 21st birthday. I think it fits the bill quite nicely.
The young lady is Princess Tilda X9666K and I bought her at Sir Stampalot some time ago. She is brilliant for any pretty, girly cards. She has been coloured using Distress inks.
I have cut her out using the 'Outside the box with a Nestie' technique that I found on Youtube and then sponged a little distress ink around the edge while the die was still in place.
The background papers are from my stash which does not seem to be getting any smaller, lol. I have added hand stitched borders with a fine black pen, and layered some of the panels over white card that has been punched using a Martha Stewart punch. The 21st is a peel off.
Of course it had to be an easel card :)
I added some ribbon. pearls, flowers, punched leaves and die cut DooHickey swirls.
I'm told that the recipient loved it, I certainly enjoyed making it.
Will post another cute card later, when I get back from class.
I had better go now or I won't get anything done today.
Happy Crafting.
Hugs Kimx

Wednesday, 7 December 2011

Cupcake challenge 171 - DIY

Evening Everyone
The challenge this week over at Cupcake Craft is DIY, create your own backing papers.
This card is actually one that I made while I was staying at Sir Stampalot at the beginning of November. It is also an example of the background technique that I shared with Louise when she expressed concern over what she could do for her DT card as part of the challenge.
We all have our comfort zones when it comes to cardmaking, and mine is definitely playing around with backgrounds. I think Louise's would probably be colouring in with her copics she is just brilliant with them. Do check out her blog for some fantastic samples, I often head there for inspiration.
Back to my card.
The background is made using the wonderful Faux Mother of Pearl technique that I found over at Splitcoast Stampers.
I created the panel using Pearl acrylic paint and cling film, and then sponged distress ink over the top.
Once it is completely dry I stamped and embossed the greeting and holly sprig onto the panel. It is from a clear stamp set that I was playing with when I was at Sir Stampalot, but I'm afraid I can't remember who it is made by, sorry.
I coloured the holly and berries with distress ink from the limited edition Christmas set, and then added some tiny drops of glossy accents to the berries.
I did use a piece of ready made background paper as well, I hope that is OK :)
A Martha Stewart border, ribbon and pearls give the finishing touches.
Off to bed now it's got so late again.
Hugs Kimx

Tuesday, 6 December 2011

A Special Card........

Evening Everyone
I've been trying to get this card on the blog for days, but I have so many things to share at the moment that it seems to have got pushed further and further down the pile.
This is actually the card that we will be making in class on Saturday, 'A special card for a special Someone.'
I have made this card using Christmassy colours and poinsettias, but I felt that it could just as easily be made as a Birthday or Anniversary card just by changing the colours and the dye cut flowers. So it will be down to the ladies to choose. That will probably be the bit that takes the longest lol.
The greetings are both from clear sets made by Hobby Art, and have been given my trademark padded touch using silicon.
Nothing says special like an Easel card, in my opinion.
The background papers are from my stash, and I have cut the flowers and borders using a combination of punches and dies.
You will be pleased to know that it might need a padded envelope, but I think we can get away without making a box :)
I'm looking forward to class already, perhaps you will join me.
Hugs
Kimx

Woodware USA Challenge - A sketch for December

  
Afternoon everyone
My card today has been made to enter into the sketch challenge over at Woodware USA.
Don't forget that this sketch is also being used in the UK over at Woodware UK so you can play along there as well.
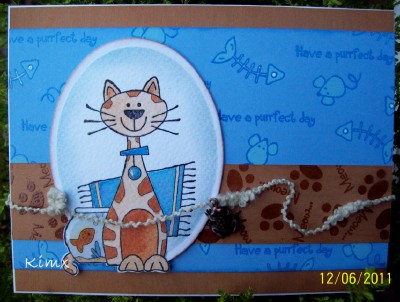
It has been made with a lovely clear stamps set called Groovy Cats FRCL124.
I have stamped and embossed the cat onto watercolour card and coloured it using dye based inks. It has been cut out using an oval nestie and a technique called 'Out of the Box with Nestabilities' which I found on Youtube. This allows you to leave part of the image outside of the nestie.
The blue background has been made using several of the smaller images from the set.
I stamped and embossed in versamark and clear embossing powder and then painted with thin undiluted bleach.
I added a white dot to the fish eyes with a Gelly roll glaze pen.
The strip of brown card has also been stamped and embossed with versamark and clear embossing powder.
I have added glossy accents to the fish bowl and collar tag.
The wool across the card is from my stash, as is the small frog charm.
I couldn't find a fish, but then given that our cat has a tendency to bring us presents of slow worms and newts it probably won't be long before she adds frogs to her repertoire. It therefore did seem kind of fitting lol.
I hope that this will inspire you to enter the challenge HERE.
I must write some Christmas cards now otherwise all my efforts to get them finished on time will go to waste.
Have a lovely evening.
Hugs
Kimx

Monday, 5 December 2011

Woodware week 28 challenge - A sketch for December

    
Evening Everyone
The card I am sharing with you tonight has been made to enter into the challenge over at Woodware.
I have used a couple of my favourite Artemio stamp sets Hedgerow Plants and Floral Collage.
The main image has been stamped and embossed using my trusty Creole Spice Kaleidacolour ink pad. I then coloured the image using ink from the same ink pad.
Since dye based ink dries very quickly some of the image has not taken the embossing powder and so when a very wet paint brush is dragged across the entire image some of the colour will bleed giving a lovely soft background. I did this first and then coloured in more specific areas of the image.
The blue card in the background has been stamped first with bleach and then a Pearlescent Sky Blue Brilliance ink pad, and finally versamark ink.
This has then been mounted onto a green card with a hand drawn stitched border added top and bottom.
A narrow strip of purple card has been added to the card before the embossed panel is attached.
Finally I added a strip of vellum attached with brads and a greeting from another Woodware clear set All through the Year FRCL171.
I hope that you will enter the challenge HERE and that you will also check out the DT samples that are posted every day.
Off  to bed now. My couple of days holiday are now at an end, it's back to the real world tomorrow and a 6am start!!
Hugs
Kimx