Followers

Showing posts with label metallic rub-ons. Show all posts

Wednesday, 6 November 2013

A Purple Poinsettia

Evening Everyone,
Amazingly we have managed to get a reasonably early night away from the unit. It was the promise of a Chinese meal that did it lol.
I have been busy prepping for tomorrows Metal and Burlap class as well as finishing off some of the bits and pieces that I have been playing with in the shop.
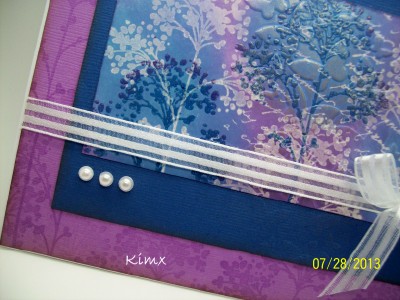
Tonight's card has been made using one of the elements from a fabulous Magenta Christmas Cling stamp set.
I stamped and embossed the image onto watercolour card and then painted it using the Pearlex Vintage Watercolour Palette. As the name suggests the colours all have a Sepia undertone to give them a very Vintage look.
The piece of purple card in the background has been dry embossed using an Embossing folder and then some Metallic Rub-ons and Platinum Glitter glue have been added.
I can't believe that tomorrow will be my last full day with Janice and Andy, I had better make the most of it.
I will be travelling to the NEC on Friday to do the Make and Takes on the Imagination stand over the weekend.
Of course I can't go to the show without a little look around now can I?
Wow this is an early night for me, I think I will make the most of it so I'm off to bed.
Night, night.
hugs Kimx

Sunday, 28 July 2013

Can you Resist some Butterflies

Evening,
And there went another weekend!!!! I can't believe how quickly it comes round to a Monday again. At least I have nearly finished another of those peskie things on my 'To Do' list, although at the moment the living room more closely resembles a tip than a haven of relaxation lol.
I also managed to finish a card using the test piece from class on Saturday.
I always show the ladies step by step how to create the given technique, in this case Resist or Ghosting, and as I don't need a second tag I try and finish it off as a card.
I used a lovely floral set from Stampendous, and Distress Inks.
 I used the same image on the purple card stock, stamped in Versamark.
 The resist panel has been attached to blue card stock and then dry embossed using a folder and Cuttlebug.
I added some metallic Rub-on to the butterflies to highlight them, although I'm not sure that they show up terribly well in the photo.
Finishing touches are some ribbon and pearls.
Must stop now or I will never get up in the morning.
Hugs Kimx

Saturday, 19 January 2013

A Purple Hedgerow

Evening Everyone
I hope that you are all tucked up in the warm enjoying some Craft Time. It is much too cold and snowy to go out, well that's my excuse anyway.
Unfortunately this week as well as having to make 'Baby' cards, I have had to make a couple of Sympathy cards, which has been hard given that this week was the 12th anniversary of my Son and Dad's passing.
Where does time go to so quickly?
This card was made using JGS272 Hedgerow from Woodware, stamped and embossed using Versamark and clear embossing powder on to white card which has wording stamped onto it in black.
The colour has been added using Adirondack Colourwash ink to create an Embossed Resist panel.  
Once the panel is dry I trimmed it to size and edged it with gold embossing powder before running it through my Cuttlebug using an Embossing folder.
I added a little Metallic Rub-on to help to highlight the embossing.
I added some shrivelled Organza Ribbon and a sentiment from Woodware FRCL154 Salutations.
The stamping down the left hand side of the card is my trusty Leaf Flourish F6042 from Hero Arts.
We seem to have escaped any further snow today, so let's hope that that remains the same for tomorrow.
Night night.
Hugs Kimx

Thursday, 9 February 2012

Watercolour Pearlex, Weather permitting!

Evening Everyone.
There I was promising myself that I would catch up on blogland and leave comments for all those lovely people that have entered our challenge over at Crafty Cardmakers, or dropped in to see me from WOYWW.
But what did I forget, I was babysitting this evening, and so none of it has happened.
Instead I thought that I would leave you a glimpse of the card that we will be making in class on Saturday at Davina's, weather permitting of course lol.
It has started to snow here so I just hope that the weather men get it wrong yet again and I don't wake up to a foot of snow :)
If we do manage to go ahead with the class on Saturday we will be playing with Pearlex, Embossing folders and metallic rub-ons.
This is actually one of the cards that I made for Hobby Art Jenny for the TV last month but it shows the watercolour technique that I will be sharing with the ladies.
It has been mounted over an embossed panel which has been highlighted using Metallic rub-ons.
Everyone is safely tucked up in bed, sound asleep, so I guess I had better follow their example.
Nite, nite.
Kimx

Tuesday, 24 January 2012

More beads for Crafty Cardmakers

Evening All,
We are asking you to use beads on your projects over at Crafty Cardmakers this time.
Having struggled to make my DT card I am now on a roll. It must be seeing all the wonderful projects that the rest of the team have made. Do check them all out, there are some fabulous creations.
I made this card using various items from my stash, including the leftover backing from a peel-off!!!!!
How sad am I you might say? Don't I have enough stamps that I could use? Well of course the answer to that is that I have hundreds but this seemed like one of those things that you just have to try.
I first saw it done somewhere years ago. In fact I remember showing the ladies on a peel-off class once that this was a good way of using up the left overs.
Once the peel-off has been removed rub permanent ink or metallic rub-ons over the backing sheet and the image pops through.

I have cut around the image and mounted it onto a tag made from Bazill card stock which has had some peel-off lines and metallic rub-on added to it.
Having punched a hole in the top of the tag I added some wire which had been threaded with beads. I twisted the wire around a knitting needle to help keep the beads in place.
Not any more adventurous than my previous card when it comes to the beads I'm afraid but I do like the effect.
I am entering this in to the challenge at Make My Monday - where they want to see Flowers and Leaves.
Better get to bed now. I have to admit I found myself doing a bit of a nodding dog impression this afternoon so I had really better try and get some sleep. Maybe I will have a granny nap tomorrow. Oh the joys of getting older lol.
hugs Kimx

Saturday, 24 December 2011

A Christmas card and the Woodware Challenge - Richness of Red

Afternoon All
This week the challenge over at Woodware has been Richness of Red, and of course I had to enter it even if it has meant making one last Christmas card.
Still now at least I can say I have started my cards for next year. Eat your heart out Mrs Till lol.
I have used a Woodware Single Festive Background JGS260, which I have stamped using a Crimson Red versafine inkpad and embossed with clear embossing powder. Some of the greetings have been painted using a red Sakura Stardust pen, a technique that I have picked up from Francoise
I then stamped and embossed the image onto red card stock using black versafine and painted Peace with thin bleach. The oval has been punched using a giant Woodware punch. I then tapped the red inkpad around the edge of the oval and embossed it with clear powder to make it stand out.
Placing the oval directly over the same image is a technique called 'Spotlighting' and is a great way of covering up a mistake or a bit of bad stamping. That actually wasn't the problem here, honest :)
I have added a fine stitched border to the main panel, a few gems, and a little Ruby red metallic rub-on to the edges.
The border has been created using the Woodware Antique Floral Crafty Edger. I added some of the Ruby Red metallic rub-on to this to make it stand out from the main card.
The house is very empty at the moment as the family are all out for the evening so I am going to make the most of the peace and quiet and craft with the TV turned up very loud.
Have a wonderful day.
With love and hugs
Kimx

Sunday, 13 December 2009

Worst Blogger in the World?


Well I think I have to be officially the worst Blogger in the World!!
All week I have been reading the Girls postings about the 2nd Utimate Rubber Stamping Day held at Sir Stampalot on Saturday 5th December. It really was the most fantastic day and I felt privileged to be demoing along side such talented ladies.
Thanks for all the fabulous ideas Girls. I hope my paper flowers are as good as yours Brenda and Louise as I have been asked to teach the ideas next year at Lavender Lane.

I didn't get many cards made for the day I'm afraid. In fact I felt very much like the poor relation when it came to displays in comparison to everyone else, there really was the most amazing art work on display.
I did get these two cards finished for the shop however, so I thought that I had better share them with you.
I've used just a couple of the Magnolia stamps available - thought I should get to play with some of them after I had counted them all:)
I will try and get some more things posted over the next couple of days but as I haven't finished making all my Christmas cards yet, let alone write them, this may be a pie in the sky promise.
At the moment we are ankle deep in Christmas decorations. Try putting up a tree with 2 year old twins, an excited 6 year old whose birthaday is next week and a small kitten helping - I think I will lock myself in my craft room. Call me when its all over. He he.
Have a good evening.
Love
Kimx

Sunday, 22 November 2009

Christmas Poinsettia

Had a wonderful afternoon on Friday, popped over to see Jenny at Hobby Art with my friend Anna.
We spent the time drinking coffee and brainstorming the next clear stamp sets so watch this space!!
Its amazing how being with like minded people can get your creative juices flowing. I came home and felt immediately inspired to make some Christmas cards.
I don't know about you but I have a 'box of bits' that seems to expand every year. These are bits left over from prepping a class or half made cards that I never seem to get the chance to finish.
I decided to sort through them, once again, its amazing what you find when you do that!! Why DID I keep that badly stamped image? What ever was I going to do with that little scrap of background paper? So many things that obviously seemed like a good idea at the time.
All these bits get put into a bag and sent with my Granddaughter Megan to Craft Club at her school. The kids seem to love all the bits and pieces that I send there way. One mans rubbish and all that!!

While I was sorting I found these lovely poinsettias so have made them into a card. I hope you like it.
The Poinsettia is of course Hobby Art. I have stamped it on to both red and green background paper, so no colouring in involved.
This is a great way of making a card if you are in a bit of a rush, and of course by putting some of the card through the cuttlebug you know that everything will co-ordinate beautifully.
Once again I have highlighted the cuttlebugged background with metallic rub ons and have added a little bit of sparkle with the clear stardust pen.
Finally I have added a greeting. This always puts a finishing touch to a card and the stamp I have used is one of my favourites Christmas wordstamps as it is just so versatile.There is also a Birthday greeting available and the wonderful thing with both of these stamps is that you can use all or just part of the greeting. Each line will cut away seperately, as I have done on this card, and then a tiny brad at each end of the greeting finishes off the whole thing.
Must get back to my Christmas cards, only another 100 or so to finish!! Thank goodness it's only once a year.
Love Kimx

Wednesday, 28 October 2009

Special Christmas cards

I've got my computer back at last. My friend Joe, who fixed it for me, told me that it was running slow, but this is just ridiculous. It has just taken me over two hours to get onto the internet and then it won't let me do anything so I've given up and am back using my daughters laptop. I've been working on this post since last weekend, so it has now officially taken me a week to finish. What is it with me and all things technical? In fact this morning after nearly throwing my laptop out of the window I finally gave up and ordered myself a new one off my catalogue. I can't wait till Friday when it is delivered. Maybe then the internet will become a joy like my good friend Gill tells me it should be. I wait in happy anticipation. Anyway, enough of me moaning thats not why you follow me is it!!!
I tried to get these cards to you on Tuesday so that you could see what I was teaching at Davina's on Wednesday evening (www.stampcraftcards.co.uk), but we won't go in to that again will we!!
I always try to give the ladies several examples to look at in the class and sometimes you just get carried away. You may also have noticed that one of my favourite toys at the moment is the cuttlebug, embossing folders and nestabilities.


These cards all use the Inkadinkadoo clear stamp sets and the new Hobby Art clear stamps greetings set, but the large tree is a wood mounted stamp by Personal Impressions which I think makes a great Christmas card even though it is not designed as such.
I'm afraid that I threw out the packaging as soon as I opened up the stamp sets so I don't know the codes, but if you go on to the Sir Stampalot web site or contact Davina I know that they will be able to help you locate them.
I was going to go into detail about how each of the cards had been made, but I think that I might be here for rather a long time and I suspect that that may be pushing my luck with all things computer.
They all involve stamping and heat embossing using either versamark and gold embossing powder, or black versafine and clear. Each coloured panel has been put through the cuttlebug using an embossing folder and the stamped panel on the top of the card has been cut out using the nestabilities all except the red and gold tree which had been cut on the guillotine.

I hang on to all my old cats eye ink pads, which are far too dry to emboss with, but are ideal for tapping around the edge of card to give that truly 'finished off' look.
Brads and ribbon are also a great way of finishing off a card, and what more can I say about peel-offs.
At one time I wouldn't have given a thank you for one, but now I own hundreds, although I have to say that I probably use more of the waste to finish off a card than I do the actual peel-off design itself.
Anyway, I think I had better post this now before anything else goes wrong. I hope that you like the cards and maybe I will post some more pictures when I've finished playing with all the leftover bits from teaching the class.
I am having a few days holiday next week so I hope that I can get on top of some of the prep work for the next few classes so that I can share them with you.
Happy Stamping!
Love Kimx