Followers

Showing posts with label Starburst Stains. Show all posts

Sunday, 27 January 2013

A Sketch challenge at Inkspirational

Evening Everyone,
I hope that you have had a good weekend.
We seem finally to have seen the last of the snow, and the start of the torrential rain that the weathermen predicted.
It has been perfect weather for Crafting, as if I need an excuse.
I have been catching up on some challenges, now all I have to do is post them all in time lol.
My card tonight has been made to enter into the Sketch challenge at Inkspirational.
I have created the circular background panel for the card using another couple of Jane Gill's new stamp sets JGCL566 English Leaves and JGCL567 Leaf Selection.
I am hoping that the catalogue and stamps will be available very soon.
I stamped the Maple leaf from one of the the sets onto a piece of pearlescent background paper that I had made previously using Starburst Stains. I stamped and embossed using Versamark and clear embossing powder, and then stamped and embossed the image again, overlapping some of the previous images this time using Walnut Stain Distress ink and clear embossing powder.
Finally I stamped again using Walnut Stain Distress Ink without embossing.
Having wiped away any excess ink I stamped the Tree Names randomly over the leaf background using Timber Brown Stazon ink.
The circles were cut out using my Nesties and then mounted onto a piece of blue card that had been stamped with the same Tree Names and Timber Brown Stazon.
The greeting is from another Woodware stamp set called FRCL207 Ribbon Banners.

The gems were coloured using Promarkers and I have even been a very good girl and embellished the envelope.
Better get to bed now, enough play for today as it's back to work tomorrow.
hugs Kimx


Tuesday, 7 August 2012

A little bit of Bling for Our Creative Corner

Evening Everyone
I hope that you have had a good day.
I should really be tucked up in bed sound asleep as I have to be at work at 5am tomorrow, but once again I got carried away with my crafting!!
They have another fabulous challenge over at Our Creative Corner. I do love this blog.
There is always a twist to the challenge so they ask you for something just that little bit different. It makes you think outside the box and stretch your creativity.
This week they are asking for 'A bit of bling mixed with Nature'.
I hope that I have managed to fulfil the challenge criteria.
I think that the main floral image is from Penny Black which I have painted with inks and then added some crystals which I coloured with Promarkers.
The background paper was made using Starburst Stains and clingfilm.
Why not pop across to Vixykins blog where she has a great tutorial for a very similar technique.
I added a bit of stamping down one side and embossed it with my favourite Frantage Aged Silver embossing  Enamel.
I added a flower cut from some of the leftover background paper as well as a Diamante Ribbon Slider and a pearl brad for the flower center.
The sentiment is from Hobby Art.
I'm really pleased with the results, especially the colour.
I would like to enter it in to the following challenges
Bearly Mine - Sparkle and Shine
Papertake Weekly challenge - Anything Goes
Lexi's Creations - Sparkle and Shine
Must get to bed now or it will already be time to get up lol.
Hugs Kimx

Friday, 17 February 2012

Merriest Wishes

Evening Everyone,
I have spent a wonderful, afternoon with my Mum who came for an unexpected visit.
It has meant however that I really am panicking over some design work that has to be finished by tomorrow afternoon when I will be teaching. Never mind, I will get it finished Teamies, I promise. 
In the mean time this is a card that I actually finished last week.
Once again it uses pieces from my Christmas bits box, in this case a lovely Hobby Art Poinsettia panel coloured using dye based inks.
I have layered it over a piece of background paper made using the resist technique which I have then coated with clear embossing powder which gives it a shiny finish.
The green background paper is handmade using Starburst stains available from The Stamp Man.
I have added some ribbon, stitching using a fine black pen and a greeting.
The challenge over at Winter Wonderland is to make a Christmas Card, any colour, any style, so I guess that this fits the bill don't you think lol.
Off to bed now so I can get my card finished in the morning. No doubt I shall be dreaming about what to do, or will it be a nightmare!!
hugs Kimx

Monday, 9 January 2012

New challenge at Crafty Cardmakers - No Floral Embellishments

Afternoon Everyone,
Today sees the start of a brand new challenge over at Crafty Cardmakers.
Our host for this Challenge is Fiona who has asked for 'No Floral Embellishments'
You can use flower Backing Paper, flowers in your image or even a flower as an image, but NO floral embellishments, so no flowers, flower shaped buttons, or anything else resembling a flower that you have added to the finished card
Our Sponsors this time are One Stop Card Craftswho are offering a £10 voucher for their store and Digi Doodle Shop who are offering a $10 gift certificate for their store.

For my card I have used an old leaf stamp by Hero Arts. I stamped and embossed the image randomly onto a piece of white copy paper using versamark and white embossing powder.
Then I painted the paper with Starburst Stains available form The Stampman. While the paper is still very wet screw it up, and then gently open it back out again. Don't panic it is very therapeutic.
Vixykins has a tutorial on how to make backgrounds using the Scrunch Technique over on her blog. The only difference would be to stamp and emboss the paper before following her instructions.
Once the paper is dry,(you can heat set it if you are really impatient or even put it in the oven like Vix :), or maybe make a whole pile of papers one evening and then leave them to dry over night) trim a panel slightly smaller than the card that you are wanting it to fit.
I then tore the panel in half and 'stitched' it back together using metallic thread.
I actually found it easier to fix the panels onto the card with DSST and then stitch.


I added a layered panel with a stamped and embossed greeting which I'm afraid was from my stash so I can't remember who it is made by.
Not a flower in sight!!
I hope you have fun playing, that's what our challenge is all about.
Bye for now, Happy Crafting.
hugs
Kimx

Tuesday, 21 June 2011

Starburst Stains and Flowers

This post was all ready last night and then my internet went down so I am posting it now.

Evening Everyone,
I can't believe how quickly Monday has come around again.
Here is a card that I made from a piece of background paper using the wonderful Starburst Stains and cling film.
The background is made by painting a piece of card with Icicle Creek Starburst Stains. While it is still very wet lay a piece of screwed up cling film over it and leave it to dry. This can take about an hour depending on how wet the card was in the first place. The longer you leave the cling film in place the better the effect. 
The mica powders suspended in the Starburst stains settle in the cavities created by the cling film and when it is removed you are left with the most amazing backgrounds. No two are ever the same, which can be very frustrating lol.
When the background is completely dry stamp and emboss using black versafine and clear embossing powder. Surprise surprise I've used my Hobby Art Anna's collection Just for You.
Hope you like it.
Happy Crafting
Love and hugs
Kimx

Sunday, 19 June 2011

More Shaving Foam and Starburst Stains

Good Morning
I had hoped that the weather was going to be a bit brighter today after the torrential rain and thunder we had yesterday, but I think I'm mistaken. It's looking quite dark here so I will expect a downpour at any moment.
The cat is obviously concerned about me being lonely as she has deposited two little presents on the door mat this morning. The mouse population is minus another two of its members lol.
This is another card that has been made using the shaving foam background technique. Why not check out the tutorial over at Splitcoast Stampers.
I've stamped onto it using Hero Arts Real Fuchsia H3259 and Hobby Art Anna's Collection Just for You. The greeting is also from Hobby Art.
The main background on the card has been made using the wonderful Starburst Stains and clingfilm.
The Starburst Stains are available from The Stampman.
Still no rain but its quite windy and not very nice.
Back to the crafting. Maybe I'll check in again later.
Thanks for stopping by. Please don't forget to leave me a comment they are always appreciated.
Happy Crafting.
Love and Hugs
Kimx

Sunday, 15 May 2011

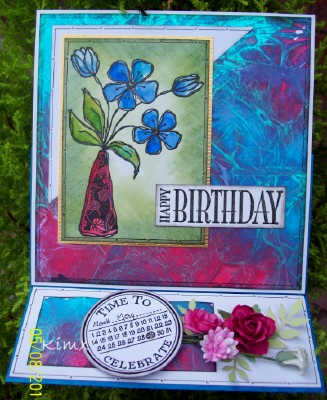
Time to Celebrate

Evening Everyone
Well I either slept through all the noise last night or else the sleepover involved just that - sleep lol.
I suspect that its much more likely that I was just plain shattered and slept through everything.
I've been a busy bunny again today trying to get on top of some class prep and interspersing it with cards for Barbara since my next parcel arrived last week.

The card I'm sharing tonight was actually made last weekend. It has been made for a friends sister. I have actually made two cards for him to choose from, I just had way too much fun making them that I couldn't make up my mind which one I liked best.
The background paper was made using Starburst Stains from The Stampman, although I can't remember which set I used to make it.
The vase is a Magenta stamp that has been coloured using dye based inks. I have sponged ink around the edges of the panel before mounting it over gold card stock.
The circular greeting is from Lili of the Valley and is a great way to personalise a card.
I've got a days holiday tomorrow so I hope that I will be able to get a load more card work done, at least that's the plan anyway.
I will post the other card that I made for my friend tomorrow and you can see which one you liked the best - I wonder if we are in agreement over which one he will choose?
Nite nite for now
Love Kimx

Tuesday, 24 November 2009

More Stamping with Clarity

These next two cards from Sundays TV show make use of some more handmade backgrounds. This time I have used the fantastic Starburst Stains available from The Stamp Man. They are mica based inks which create the most fabulous backgrounds.
Unfortunately my photographs don't do them justice as you loose all the pearlescents but believe me, they are wonderful. I have used a sheet of cream cardstock and covered it with several colours of the inks. While it is still quite wet I have placed a screwed up piece of clingfilm over the whole sheet.
Now you must be patient. This is dificult for crafters I know, but if you remove the clingfilm before the ink is totally dry you will ruin the effect,and it is so well worth the wait.
This first card uses the Daydreamer under the Tree stamped and embossed in black ink onto some of the handmade background card. Trim around the image and cuttlebug the lefthand side of the panel. Use a border punch along the right hand edge.
Mount onto black glossy, and then olive green card stock.
The main card has a panel of acetate attached to it. This has first been stamped with the bullrushes and a white stazon inkpad. Attach the main panel to the card and add brads to the corners.
As a final touch I have added the greeting which has been stamped onto shrink plastic.

The second card again uses the handmade background paper with the Daydreamer stamped on to it. This time I have cut out a panel using one of the nestabilities and then mounted it onto black glossy card.
These are definately one of my favourite things to play with at the moment.
Attach a piece of ribbon to the left hand side of a cuttlebugged panel and add this to a white card. Attach the main panel to this and embellish with brads and peel-off dots.
Will post the last of the cards tomorrow, but for now I'm just off to Pilates. That sounds posh doesn't it, believe me it's not but its about the only exercise that I get, crafting is just so much more fun.
Happy Stamping
Love Kimx