Followers

Wednesday, 30 September 2015

Hobby Art Big Tree

Evening All
It's been another gloriously sunny day here, even if it has been a little bit chilly.
Hobby Art Jenny has been on the box today with a fabulous show that was also broadcast in America.
Unfortunately Jenny was one of the people that I let down with my 'days in September' malfunction.
With that in mind I thought that I would share a card that I made using one of her beautiful foam mounted Tree stamps.
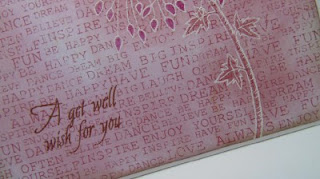
The background for the stamped tree was created with a Magic stamp. This was pressed into some fern leaves and then inked and stamped onto a piece of white card stock.
I drew a border around the panel with a black Micron pen and then coloured it with co-ordinating pens.
The background panel is a piece of Faux Mother of Pearl (see HERE for instructions) sponged with Distress Inks.
I stamped around the edges of this panel using the same tree stamp and dark brown ink. It makes a wonderful border and shows just how versatile stamps can be.
Have a good evening. I hope that Jenny has a safe and uneventful trip back from Peterboro tonight.
It's an early night for me I think.
One of the Girls at work brought in curry for us all today as it was her birthday.
It was extremely hot and spicy but very delicious. The trouble is that eating dinner so early in the day just made me want to curl up and go to sleep, so I think I was very virtuous going to the gym after work instead of going home for a granny nap lol.
Hugs Kimx

Tuesday, 29 September 2015

There is a new Sketch from Woodware this week.

OMG, I'm so confused. Where has September gone? I could have sworn that I had another week to go, which has meant that I have let people down, which is never something I plan to do.
We have had Becki and Emma come to stay rather unexpectedly, which is my excuse, as if I need one for being easily confused.
They have a lovely new sketch for you over at Woodware this week.
Unfortunately they are still experiencing problems on the blog which is very frustrating.
I love sketches, they are such a useful place to start when you are stuck for a card idea.
Now I hate to waste anything, as is the case with most crafters, so I have a stash of card scraps on my table ready to wipe up any excess ink from my craft sheet.
Spritz the ink with water or glimmer mist and wipe the card through it.......instant background paper.
So that is where I started for this card.
I stamped and embossed the leaves onto the panel using Vintage Sepia Versafine ink and clear embossing powder and then coloured them with matching dye based inks.
The background panel to the card has been created using another of my favourite Doobadoo stencils - I just love these.
I ran it through my Grand Calibur and then sponged the resulting embossed card with more dye based inks.
As there are some spaces in this particular design I stamped and embossed more of the leaves in to these gaps.
Of course no card would complete at the moment without a touch of Gilding Wax in both gold and bronze.
The ribbed card is from my stash and picks up the wax beautifully even if it is difficult to photograph.
I hope that you will join us this week, even if I am a little unsure as to where the posts are being placed. If all else fails contact Dorothy at Woodware and she will point you in the right direction. That's what I intend to do. Good old Dorothy, always there to aid and assist.
Hugs to All, and happy crafting.
Kimx

Monday, 28 September 2015

IOU some babysitting

Hi All
I hope that you had a lovely weekend.
Wasn't the weather on Saturday wonderful.
I was 'Stand in Mum' at a baby shower for the daughter of my best friend, and we spent a lovely afternoon sitting in the garden surrounded by sunshine, food and several small children.
I decided that Lucy would be given loads of gifts for the baby so I would get something for Mummy.
Part of my prezzie was horribly practical (maternity towels and breast pads how glamorous I hear you say) and the rest were some handmade IOUs.
Having become a Grandma again only recently I know first hand how difficult it is for Mum to get time to herself for even the most mundane of things, like a bath or even a sleep. So I figured that she might appreciate a few hours of babysitting instead of yet another baby outfit.
Now I just can't wait for her to need to use them and as she only has another four weeks to go I shouldn't have to wait too much longer lol.
Hugs Kimx

Sunday, 27 September 2015

A Trio of Tags made into Cards

Hi All
As promised I am back with the cards that I made with the tags from the Woodware Trio of Tags blog post.
(see HERE)
I'm just sorry that it has taken me so long.
I have made the cards in the same style, just using different background papers from my stash.
This first one has just had the script panel stamped and embossed onto the background paper and then some faux stitching and Card Candi have been added.
This card uses a different piece of background paper which has also been stamped using the holly sprig as well as the script stamps.
This final card uses another background paper from my stash, the script stamp and some red Card Candi.
That's another three cards to add to my Christmas pile.
I really must update my totals at the top of the page but other things keep getting in the way, like unexpected visits from my littlest Granddaughter who just has to be cuddled lol.
Hugs Kimx

Wednesday, 23 September 2015

Paper Pieced Christmas at Woodware

Hi All
It is my turn to play at Woodware again today, but I'm afraid that I am very late to the party.
I confess that I must have fallen asleep as I was writing the post and forget to schedule it, which on reflection is probably no bad thing given it's half finished nature lol.
Dorothy has chosen 'Paper Pieced Christmas ' for us this week.
I love Francoise Huge Word stamps which lend themselves perfectly to this type of technique.
I made a circular easel card for my project using papers from a Craftwork Cards paper pad and a sheet of green Magenta paper.
I added a few snowflakes to the image before I attached any of the fussy cut letters so that they look as if they are behind the writing.
Stamp and emboss the Jingle Bells onto three different pieces of background paper and again on to a large white circle of card.
Fussy cut all the letters from the sheets of background paper and lay them onto the image on the white card before sticking them in place using wet glue.
The base of the easel card has been embellished with flowers punched from the scraps of paper
and branches cut from the Dreamweaver die cut Naked Tree. This was cut from some home made glitter paper
I searched high and low for some bells to add to the card (Davina came to my rescue with a couple that she found in her stash, added with the ribbon bow) and then I remembered that the stamp set actually contained its very own bell stamp.
One of the things I love about Paper Piecing is that with a bit of thought during the cutting process you can actually end up with several finished panels which are then very easy to turn into cards.
So watch this space, as they say, cause you know I'm on a mission to use up all the left overs lol.
I hope that Dorothy will forgive me for the lateness of this post, and that you enjoy a bit of Paper Piecing inspiration from the Team this week.
Better get this posted before I fall asleep again. I've been to the gym this afternoon and I'm starting to feel sleepy.
Night night.
Hugs Kimx

Monday, 21 September 2015

Make it Sparkle for CCM&More

Hi All
It's time for a new challenge over at CCM&More  where our host Sally is asking for you to 'Make it Sparkle'. Any type of sparkle is allowed so its time to break out the glitter, gems, pearls or shimmer sprays etc.
Now I'm not really a glitter girl by any means, but Christmas just wouldn't be the same without plenty of sparkle so it seemed the perfect opportunity to add to my stash of Christmas cards.
I created a piece of background paper using a selection of Woodware Christmas stamps, versamark, white embossing powder and dye based inks.
This is often referred to as a masterboard which is then chopped up to create a series of cards.
I chopped my masterboard into four pieces to create my cards. I dry embossed each piece with a different Christmassy embossing folder and then wiped a dye based ink pad across the embossed image before adding Crystal embossing powder for my hint of sparkle.
The resulting panels screamed out for a sentiment to be added, which had to be done using a piece of torn acetate since it is almost impossible to stamp onto a dry embossed image.
I added faux stitching around the edges and attached the acetate with brads.
Of course I stupidly forgot how difficult it is to photograph acetate when I made the cards, but they do sparkle - honest.
Don't forget to drop in and see what the rest of the team have been up to. We have some lovely new team members as well who would love you to stop by and say hi.
Have a great Monday. I'm off to cuddle the littlest Granddaughter who is currently staying with us.
Oh the hardship of being a Grandparent, and I can give her back if she starts to cry lol.
Happy Crafting and hugs
Kimx

Sunday, 20 September 2015

We like to start them young

Evening Everyone,
Have you had a good weekend? I have.
We had a rather special visitor to class at Davina's on Saturday.
My daughter Becki and youngest granddaughter Emma arrived for an unexpected visit.
It was so lovely to see Littlie who enjoyed a bit of kick about on her mat.
She was also passed around the table so that everyone got to have a cuddle, so I hope that she picked up some crafty pointers.
Start them while they are young I say, although this might be a little excessive lol.
I think the Girls managed to get some crafting done, although they seemed to enjoy the distraction.
They always say that they lived through the pregnancy with me, so it was nice for them to see the end result in the flesh.
Emma certainly seemed to enjoy the attention.
Hugs Kimx

Thursday, 17 September 2015

A One Colour Wonder at Woodware

Hi All
It's my turn to share a 'One Colour Wonder' over on the Woodware Blog today.
 I actually made this for the latest copy of the Woodware catalogue.
I stamped Jane's fabulous floral image onto a sheet of paper from the Craftwork Cards paper pad 'More than Words' using Versamark and White Embossing Powder.
Next I sponged the panel with Blue dye based ink paying special attention to the outer edges of the panel and the flower head.
I have used a waterbrush to colour the flower, stem and leaves.
 I also tried out a different colour combination.
I'm actually not sure which one I like the best.
Hope you are enjoying the stunning creations that the rest of the team have made for you this week.
Happy Crafting.
Hugs Kimx

Tuesday, 15 September 2015

Babies are such a nice way to start people.

Hi All
I had a wonderful weekend with my littlest Granddaughter, and her Mum and Dad of course, so I thought that it was about time I got around to sharing the card that I made for them to celebrate her birth at the end of July.
I can't believe where the weeks have flown to. Emma is now 7 weeks old!!!!!!
The background to my card has been made using one of my all time favourite bits of crafty equipment. The Magic Stamp available from Woodware is a fabulous remouldable block which has been heated and then pressed against Emma's hand and foot to create a custom stamp.
I have one of these for each of the Grandchildren, made when they were only a few days old. Megan's is now 15 years old, so they last a lifetime.
I have used it to stamp all over the background card using pink dye based ink. I then ran the panel through my E-bosser inside a dotty embossing folder.
The main image is from LOTV, and for once I actually coloured it in myself rather than using a topper.
I die cut some letters and the date and then added some other tiny sentiments.
'Babies are such a nice way to start people' is from a LOTV clear stamp set which I added to a die cut tag.
I also added some tiny metal embellishments and a button.
I was thrilled to see that this now takes pride of place on the mantelpiece inside a nice frame.
Emma isn't really a hatty sort of a baby, although we did play dress up while I was up there at the weekend, trying on some of her many outfits to see which ones would fit her. I will have to get Becki to send me a couple of pictures so that I can share them with you as there were one or two hats amongst them if I recall correctly.
Better get to bed now as it is back to work tomorrow.
Bye for now, and thanks for stopping by.
Hugs Kimx

Monday, 14 September 2015

Floral Embellishments at CCM&More, sorry I'm late

Hi All
Oh Dear, I did it again.
I am trying to pay catch up after spending a fabulous weekend visiting my youngest Granddaughter and realised that I haven't blogged my card from last Monday when we started a new Floral Embellishments challenge over at CCM&More.
I actually made this card for the latest copy of the Woodware Catalogue (page 16/17)
using a lovely floral stamp set, some Dreamweaver leaf dies
and my favourite Dutch Doobadoo Dotty stencil, dye based inks and Gold Gilding Wax.
I fussy cut all the flowers and added them to the handmade background using silicon to give them added dimension.
I hope that you get the chance to pop over and see what the rest of the team have been up to before the challenge finishes, and I will try and get round to visiting some of the lovely entries.
By for now.
hugs Kimx

Friday, 11 September 2015

A Trio of Tags for Woodware.

Hi All
I'm helping out over at Woodware again this week, and this time the lovely Dorothy has asked for a 'Trio of Tags'
I decided that I would use the same stamps but three different techniques to colour them in.
This first tag has been stamped and embossed using black ink and clear embossing powder. The images have then been painted with thin undiluted bleach.
Not all card will 'bleach out', so you may need to experiment.
Once the bleach had dried I coloured the images with watercolour crayons. I also splattered the tag with some 'Stardust pen' mixed with water.
The second tag has also been stamped and embossed with black ink and clear embossing powder, this tiime onto black cardstock.
The images have then been coloured with Dreamwaever Metallic FX - Goldfinch, Kimono Red and Ivy Garden and then splattered with a little of the Goldfinch.
The final tag has been stamped and embossed onto Kraft card using Versamark ink and white embossing powder.
This time I sponged the images with dye based inks and then coloured the ribbon with Stardust pen.
The finishing touches include some Glossy Accents on the berries, Gold Gilding wax on the edges of the tags and some shrivelled dotty ribbon.
Don't forget to check out what the rest of the team have been up to.
Hugs Kimx