Monday, 28 November 2011
Crafty Cardmakers challenge 57 - Heat Embossing
Hello everyone, welcome to another challenge over at Crafty Cardmakers where Josephine has asked you to use 'Any technique using heat embossing - stamping or ultra-thick embossing powder or something else I haven't thought of!'
We are kindly sponsored for this challenge by The Stampman (and Lady of course!) who are offering the winner the lovely Starburst Stains Brush on The Fun Holly Wreath set (pictured above on the right hand side) deep, rich, vibrant colours with a two-toned shimmer!
These are all dye based products, which gives them their vibrancy, and they can be used on any porous surface, (paper, wood, fabric, balsa, chipboard, etc).
Instructions on how to use: Add hot water, (filtered preferably, especially with the stains), let sit at least 10 minutes. Shake or stir before each use. They really are stunning to use.
Now for my card for the challenge.
This was an easy challenge for me as embossing has to be my all time favourite thing to do :)
I have used a lovely Artemio clear stamp set 10001411 Floral Collage.
The background panel has been created using an Embossed resist technique.
First I stamped and embossed the flowers from the set, as illustrated, onto a piece of white card stock using versamark ink and white embossing powder.
Next I sponged Distress inks Iced Spruce, Weathered Wood and a little Black Soot over the entire thing. Then I stamped some of the flowers again but this time using the Weathered Wood ink pad.
Once you have finished stamping, wipe over the whole thing with a piece of kitchen paper to remove any excess ink. If you forget to do this bit you will wonder why you are getting in such a mess!!!. This is because the embossing acts as a resist (as its name suggests) and the ink won't dry on it.
The main panel has been stamped and embossed in black versafine ink and clear embossing powder on to a piece of white card stock. Then I have coloured it using Barn Door and Festive Berries distress inks which I have sponged over the image.
I have painted the leaves with Evergreen Bough distress ink. The entire panel has then been coated in clear embossing powder which when heated gives a slightly pitted and shiny finish.
It is amazing how long the ink stays wet on the card because it has been sponged on.
If however you find that your panel has dried too quickly and the embossing powder doesn't stick then gently tap a CLEAN versamark ink pad over the entire thing, and then coat with embossing powder.
This will give a much smoother finish, I personally prefer the more pitted effect that you get when not all of the image takes the powder.
I have trimmed the background panel to fit onto a large red card and used the small strip that I cut from it across the centre.
Mount the main image over black glossy card stock and add it to the card.
The final embellishments are a fine hand drawn border, some card candy and of course a little bling on the flower centres. Oh I forgot I painted them with bleach before I added the embossing powder, sorry lol.
I hope that you will all be inspired to enter the challenge, and don't forget to check out what the other girls have done. Also how about joining the Design Team.
Happy Crafting.
Hugs
Kimx
Saturday, 26 November 2011
Using up the left overs!!
Evening All
Hope you are having a good weekend, I can't believe that we are half way through it already.
As promised I remembered to take pictures of the card that I made from the left overs of yesterdays card for the Woodware challenge Pick a Colour and go with it.
I have used the holly from the Woodware clear set FRCL174 to stamp and emboss the dark blue and pale blue card stock. I have then painted the images with thin undiluted bleach.
The flowers have been cut from card using Marianne Creatable Serrated Poinsettia and the leaves are made with a Martha Stewart punch.
I used the semi circular section left over from yesterdays card and then added some Woodware dotted ribbon and glossy accents to the stamped dots. Pearls at the centre of the flowers and some stitching finish things off nicely.
I am also entering this into Drunken Stampers challenge 79 Monochromatic
The Secret Crafter challenge 162 Borders and Flowers.
Sweet Stampin challenge Punched and Dies
Hope you like it.
Hugs
Kimx
Friday, 25 November 2011
Woodware challenge week 26 - Pick a Colour
Evening Everyone,
Sorry I've been missing for a few days but it has been one of those weeks, again!!
I have been trying all week to get this posted, but I keep forgetting to take pictures, and it gets dark so early now. This week over on the Woodware Blog the challenge is to 'Pick a colour and go with it.'
Like Pam the Pampered Stamper, I have chosen to go with blue.
The main stamped image is by Magenta 40.194M Christmas Stockings. I stamped and embossed it and then sponged it with inks from the Blue Breeze Kaleidacolor ink pad.
I painted parts of the stocking with bleach, before pouring crystal embossing powder over the entire thing.
The background to the card is made from a piece card from a GCD paper pack Rockets Red Glare which has been stamped using the holly from FRCL174 Holly Swirls, a clear stamp set, using a versamark ink pad and clear embossing powder. The holly leaves and dots have then been painted with bleach. I cut the circular panel using a Grand Nestie and added part of it to the right hand side of a square card.
The greeting is also from the same clear stamp set. Being a clear stamp I was able to bend it on the block so that it matched the curve of the circle.
Another shape cut with a nestie, some Woodware ribbon, pearls and faux stitching and you have another Christmas card to add to my pile.
I even used the left over bits to make another card, but I will have to share that with you tomorrow, cause it got to dark to take pictures lol.
I would also like to enter this into the Bloggers Challenge where you are asked to use your favourite colours.
Must get some sleep now.
Have a good weekend.
Hugs
Kimx
Sunday, 20 November 2011
A Gem of a Challenge 34 - a sketch
Evening Everyone
Just a quick post tonight to share another of the cards that I made using the new Hobby Art Poppy Scene it set.
For this card I have used the lovely sketch over at A Gem of a Challenge where they also want to see 'Stitching real or faux and a sentiment of your choice.'
I have used one of the smaller stamps in the set to create the piece of background paper which has been stamped and embossed with white powder and then sponged with distress ink. This technique is known as Embossed Resist.
This piece of background has been used to form the strip across the card as well as the panel to the left of the main image.
The main image has been stamped and embossed onto a piece of handmade background paper and painted with distress inks.
The main panel has been cut out using a circular nestie, and faux stitching added with a fine black pen.
The border punch is Martha Stewart and the greeting is also from another Hobby Art clear stamp set.
I've added a few black peel-off dots and a little glossy accents.
Oh boy the end of another weekend they seem to be flying by just lately.
Hope you have had a good one anyway.
Hugs to All
Kimx
Saturday, 19 November 2011
More Traditional Christmas for the Woodware challenge
M0447 Christmas Botanical Tile
As I told you yesterday I got a little carried away when I started making a card to enter into this weeks Woodware Challenge.
I just love this Magenta stamp, it so obviously lends itself to colouring in and so here I stamped and embossed the image onto green card stock and then painted it with thin undiluted bleach.
Once the bleach is dry (you can give it a blast of heat from a heat gun if necessary), paint the image with distress inks. The bleach will have taken the colour out of the card and allow the inks to retain their true colours. Remember not all card stock will bleach so you need to experiment a little.
The panel on this second card has been created in exactly the same way but I only painted the holly leaves.
The berries have had glossy accents added to them as well as some small pearls on the border strip which has been created with a Martha Stewart punch.
This third card has been created using the same bleaching technique only this time I have not added any further colour.
I added a little gold ink around the edge of the panel before mounting it onto black glossy card stock.
For this final card I have only used part of the stamp as the main focus. Once again I have decoupaged this using scraps of red and green card.
The background for the card has been created by stamping the image several times onto glossy card stock using a versamark ink pad, and then sponging dye based ink over it. This is called a Resist technique, and here I have then cover the entire panel in clear embossing powder to give it an embossed, shiny finish.
Today saw my first Saturday class at Davina's, it seemed so strange to have to shut out the sunshine when it is normally dark when I teach there lol.
Everyone enjoyed themselves I think, and were truly amazed at just how much stock can be kept in a kitchen. Davina runs the shop from her house and obviously has a very understanding husband.
We have decided that as of next month we will be running a monthly challenge using the Woodware sketch. The ladies will have two chances of winning since we will send pictures of their cards to Dorothy so that they can be entered in to the on line challenge and then Davina and I will choose a winner from their cards at the end of the month.
It will be nice not to be the only one entering the challenge for a change lol.
Oh dear look at the time, better get to bed.
Nite nite
Hugs
Kimx
Friday, 18 November 2011
Sketch Saturday with Poppies
Evening everyone
Just one last quick post before I head off to bed.
This is another of the cards that I made for Jenny's TV show on Tuesday, and is based on the lovely sketch over at Sketch Saturday.
The poppy has been stamped and embossed onto a piece of handmade background paper and then painted with distress inks. It has then been cut out using an oval nestie.
The main body of the card has been created from various scraps of background paper from my stash.
The four small circles have been made from left over pieces of the main panel which have been stamped with smaller images and then punched with a small circle punch.
I added a border with a fine black pen and a few well placed black pearls.
Hope you like it.
Nite nite
Kimx
Woodware Challenge - Traditional Christmas
Afternoon All
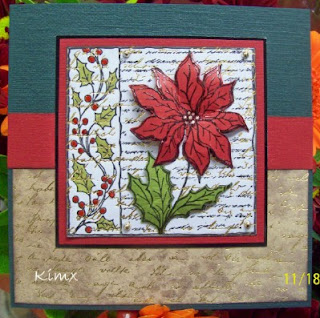
This week the challenge over at Woodware is Traditional Christmas. Now for me, like Dorothy at Woodware, Traditional Christmas just has to be Red and Green, and of course there is nothing more traditionally Christmassy than a nice red Poinsettia.
The one I have used here is a stamp by Magenta Christmas Botanical Tile M0447, and is a real favourite of mine. In fact this has taken me a week to post as I got a bit carried away and ended up making 7 cards !!!!!
I think that I will split them over a couple of posts so you don't get too bored.
This first card sees the image stamped and embossed on to a couple of pieces of background paper from my stash. I have then decoupaged the Poinsettia and leaves and painted the side panel with distress inks and gelly roll glaze pens.
The resulting panel has been added to a card that I have stamped and embossed with versamark and clear embossing powder. I have then painted the images with bleach, which in this case has turned the card a lovely bluey colour.
This second card has been created in a similar manner, but this time the main panel has been attached to a folded red card that has first been sprayed with Gold Spray Webbing. The gold border has been created with a strip of Woodware red Ultra High Bond Tape and some foil.
The panel in this card has been mounted on to a green card that has first been embellished with some left over bits of background paper.
The final card today finds the main panel mounted onto some green Bazzil dotted Swiss card. I have added some stitching around the edge with a fine black pen.
I think that is enough for one post, I will try and share the rest tomorrow.
Have a good evening.
Hugs
Kimx
Thursday, 17 November 2011
Allsorts Challenge 129 - Black and White plus One
Evening All
People are always asking me where the ideas for my cards come from. Well I have always found the challenges so very useful when I am trying to work to a deadline for DT work and now that Louise has shown me the Feline Playful blog it is so much easier.
They post a daily list which includes the challenges for that particular day and also a separate list of the winners from the previous weeks challenges.
This is where I found out that I had won the Sunday Sketch and Stamp challenge.
So when I was given a new set of stamps to play with by Hobby Art I had a quick scroll down the challenges for a touch of inspiration.
I didn't have to look far. The challenge this week over at Allsorts is Black and White plus One.
Black and White has always been a particular favourite of mine, so very elegant, and the addition of a little red, well need I say more.
The background panel has been created by stamping the poppy onto glossy card stock using a Versamark ink pad and then sponging over the top with distress inks (weathered wood and black soot)
I have stamped and embossed the poppy onto watercolour card and coloured it using the same distress inks. I then cut it out using an oval nestie and gave it my trademark padded look.
I have mounted it over a slightly larger red oval and added it to the card along with a piece of ribbon, a poppy and some punched leaves.
The card has been finished with some stitching and black gems.
I get the impression that I was not the only one to have missed Jenny's show on Create and Craft this Tuesday so I hope that this sample helps. It really is a lovely stamp set. I thoroughly enjoyed playing with it.
Off to bed now, I hadn't realized how late it had got.
Nite nite.
Hugs
Kimx
Wednesday, 16 November 2011
Cute Card Thursday - Reds for Rememberance
Hi All, hope you are having a good day.
The challenge over at Cute Card Thursday is Reds for Remembrance, so this card seemed eminently suitable.
I made it using a couple of stamps from the lovely new Hobby Art clear set CS044D Poppy Scene-it.
Jenny was using it on the TV yesterday. Well at least I think she did, but since C and C changed the title of the show after I had gone to work yesterday my sky box didn't tape it aaarrrgggggg.
I was in full ranting mode when I found out and sent them an e-mail. I await their reply with interest but am not holding my breathe.
The set is so new in fact, that it hasn't even made it's way on to the Hobby Art Website so I will have to take a picture of it and add it later.
I have stamped and embossed the poppies using versafine and clear embossing powder onto a piece of handmade background paper. I have then coloured them using Distress inks.
The panel has been cut out using a nestie and faux stitching has been added with a fine black pen.
Some matte and layering and a little more stitching and voi la.
Better post this now or I will have missed the challenge completely.
Hugs
Kimx
Monday, 14 November 2011
Challenge 56 Recycled at Crafty Cardmakers
Hi All
Welcome to the new challenge over at Crafty Cardmakers.
My family consider me to be somewhat of a hoarder (I take after my Mum lol ) so I'm sure that they will be thrilled to see that I actually made use of some of the so called 'rubbish'.
The challenge this fortnight is Recycled.
Use something that is recycled, for example a pringles container into a pen pot, the inside of a parcel tape roll to make a jewellery box. Alternatively just something on the project that is recycled, ie corrugated cardboard for background, bits of sweet box ribbon, shiny foil etc.
We're sponsored again by the lovely Joanna Sheen who is offering a £10 voucher for her online shop which is crammed full of goodies with new stock arriving all the time!
I'm not much of a one for pen pots or the like, so I decided to stick with card making and recycle the inside of a roll of DSST to make a shaker card.
I get through so many rolls of tape it's untrue, it really is my favourite medium to stick things down with, so this seemed the ideal way to make use of the leftovers instead of shoving them in the bin, even if the kids object :)
I have used the lovely new Christmas stamp set from Hobby Art called Santa's Reindeer.
The fir branches have been embossed with one of the new Stampendous Fran tage Aged Silver embossing powder.
The Robin and Reindeer have been painted with coffee and the new Limited Edition Distress inks Winter.
I have used circular nesties and some white flower soft and glitter for the snow inside the shaker.
I thought that we might make a variation of this on the first Saturday class at Davina's on Saturday 19th. Of course if the ladies bring the inside of a reel of tape with them they can copy it exactly.
Perhaps they can view that as their homework - use up a reel of tape before then.
I'm sure I will be able to lol.
I am loaning this card to Jenny for her TV show tomorrow.
You can see it on Create and Craft sky channel 671 at 3pm tomorrow the 15th November.
I'm in need of a little Granny nap now. I had to start work at 5am this morning, and I think I must have woken every hour, on the hour, so I am shattered.
Have a good evening
Hugs
Kimx
Friday, 11 November 2011
Featured in this months Craft Stamper
Evening Everyone
I've been trying to get this posted for about a week now, but something has always got in the way.
So tonight is the night.
This is the card that features on page 41 of the December Craft Stamper in the 'Oh Christmas Tree' gallery.
The instructions for creating the card can be found on line on the Web Extra page.
I made the card on behalf of Sir Stampalot, from whom you can purchase all the products used.
That's all from me tonight. I have new Hobby art stamps to play with tomorrow, and Barbara to watch on the box In the Classroom lesson 4 (Create and Craft Sky channel 671 at 11am - 1pm).
It's a hard life, but someone has to do it :)
Nite, nite
Hugs
Kimx
I've been trying to get this posted for about a week now, but something has always got in the way.
So tonight is the night.
This is the card that features on page 41 of the December Craft Stamper in the 'Oh Christmas Tree' gallery.
The instructions for creating the card can be found on line on the Web Extra page.
I made the card on behalf of Sir Stampalot, from whom you can purchase all the products used.
As I said the instructions are available on the web Extra page but I will repeat them here just in case.
Stamp and emboss Hero Arts Winter Scene onto white card stock using Versamark ink and gold embossing powder.
Cut out using Nestabilities Labels 17.
Before removing the image from the Nestabilities die add a small circle punched from a Post-it Note and sponge the entire thing with Antique Linen Distress Ink holding the Nestie in place while you sponge the ink. Remove the punched circle and Nestie and add a stitched border with a Sakura Micron pen.
Stamp and emboss Season's Greetings from Woodware All Through the Year. Cut out using a circular Nestie and apply ink as for the main image.
Emboss a piece of green Echo Park background paper using Cuttlebug Folder Holly Ribbon, cut to size and gently apply gold Encore ink using your finger tip.
Cut a piece of red Echo Park background paper to fit a 14.5cm square white card. Before attaching to the white card, stamp and emboss the trees from the Winter Scene along the bottom edge of the red card using Versamark and clear embossing powder, and then stamp Magnolia Swirl Flourish down the left hand side of the red card using gold encore ink.
Assemble the pieces as illustrated and embellish with pearls.
That's all from me tonight. I have new Hobby art stamps to play with tomorrow, and Barbara to watch on the box In the Classroom lesson 4 (Create and Craft Sky channel 671 at 11am - 1pm).
It's a hard life, but someone has to do it :)
Nite, nite
Hugs
Kimx
First Saturday class at Davina's on the 19th
Afternoon Everyone
I thought that you might like a sneek peek of one of the cards that we will be making at Davina's (Stampcraft in Purley) on 19th November.
We have moved one of my Wednesday evening classes to a Saturday afternoon to accomodate some of the lovely ladies from Lavender Lane. The class will run from 1.30pm till 4pm and I hope that we will all have a great deal of fun making cards using the lovely new stamp set from Hobby Art Santa's Reindeer.
I got the idea for this card from the lovely Chris when I was in Peterboro last week. Thank you Chris xx
Happy Crafting.
Hugs
Kimx
Thursday, 10 November 2011
Fetch a Sketch challenge 10
Well I've made it through the first couple of days back at work, although I seem to have come down with a stinking cold.
At least it waited till I was back at home to strike so that it didn't spoil my holiday.
I managed to get a couple of things finished before I started to feel rotten, one of them being this card which I am entering into the challenge over at Fetch a Sketch.
I have rotated the sketch, but I think you can still recognise it.
The main panel is created using a Kaleidacolour ink pad Creole Spice, one of my favourites, and the lovely Artemio clear stamp set Hedgerow Plants 10001147.
I have cut the panel out using an oval Grand Nestie and stamped a greeting onto it from Hobby Art Sentiments clear set.
The greeting actually didn't stand out very well so I restamped and embossed it onto vellum and layered it over the original image so that no one would be any the wiser.
The die cut flower and leaves are Magnolia DooHickeys.
The background card is Bazzil Dotted Swiss from Sir Stampalot.
That's about as much as I can managed tonight, I hate it when you can't breathe with a cold and find yourself constantly sniffing, I'm always telling the kids off for it lol.
Off to bed now, I have work again tomorrow.
Nite nite
Hugs, but no kisses, I wouldn't want you to catch my cold :)
Kimx
K
Subscribe to:
Posts (Atom)